


babyDuino
Edward Ward
I created an activity board for toddlers / children based visually on an Arduino UNO. There are two types of input and two types of output - the material is mainly wood.
Overview
After making some basic observations of my daughters interaction with the pyisical world, namely the dishwaher (buttons) and the living room speakers (front aux in and chromecast audio) I decided to focus the project around an activity board for her.
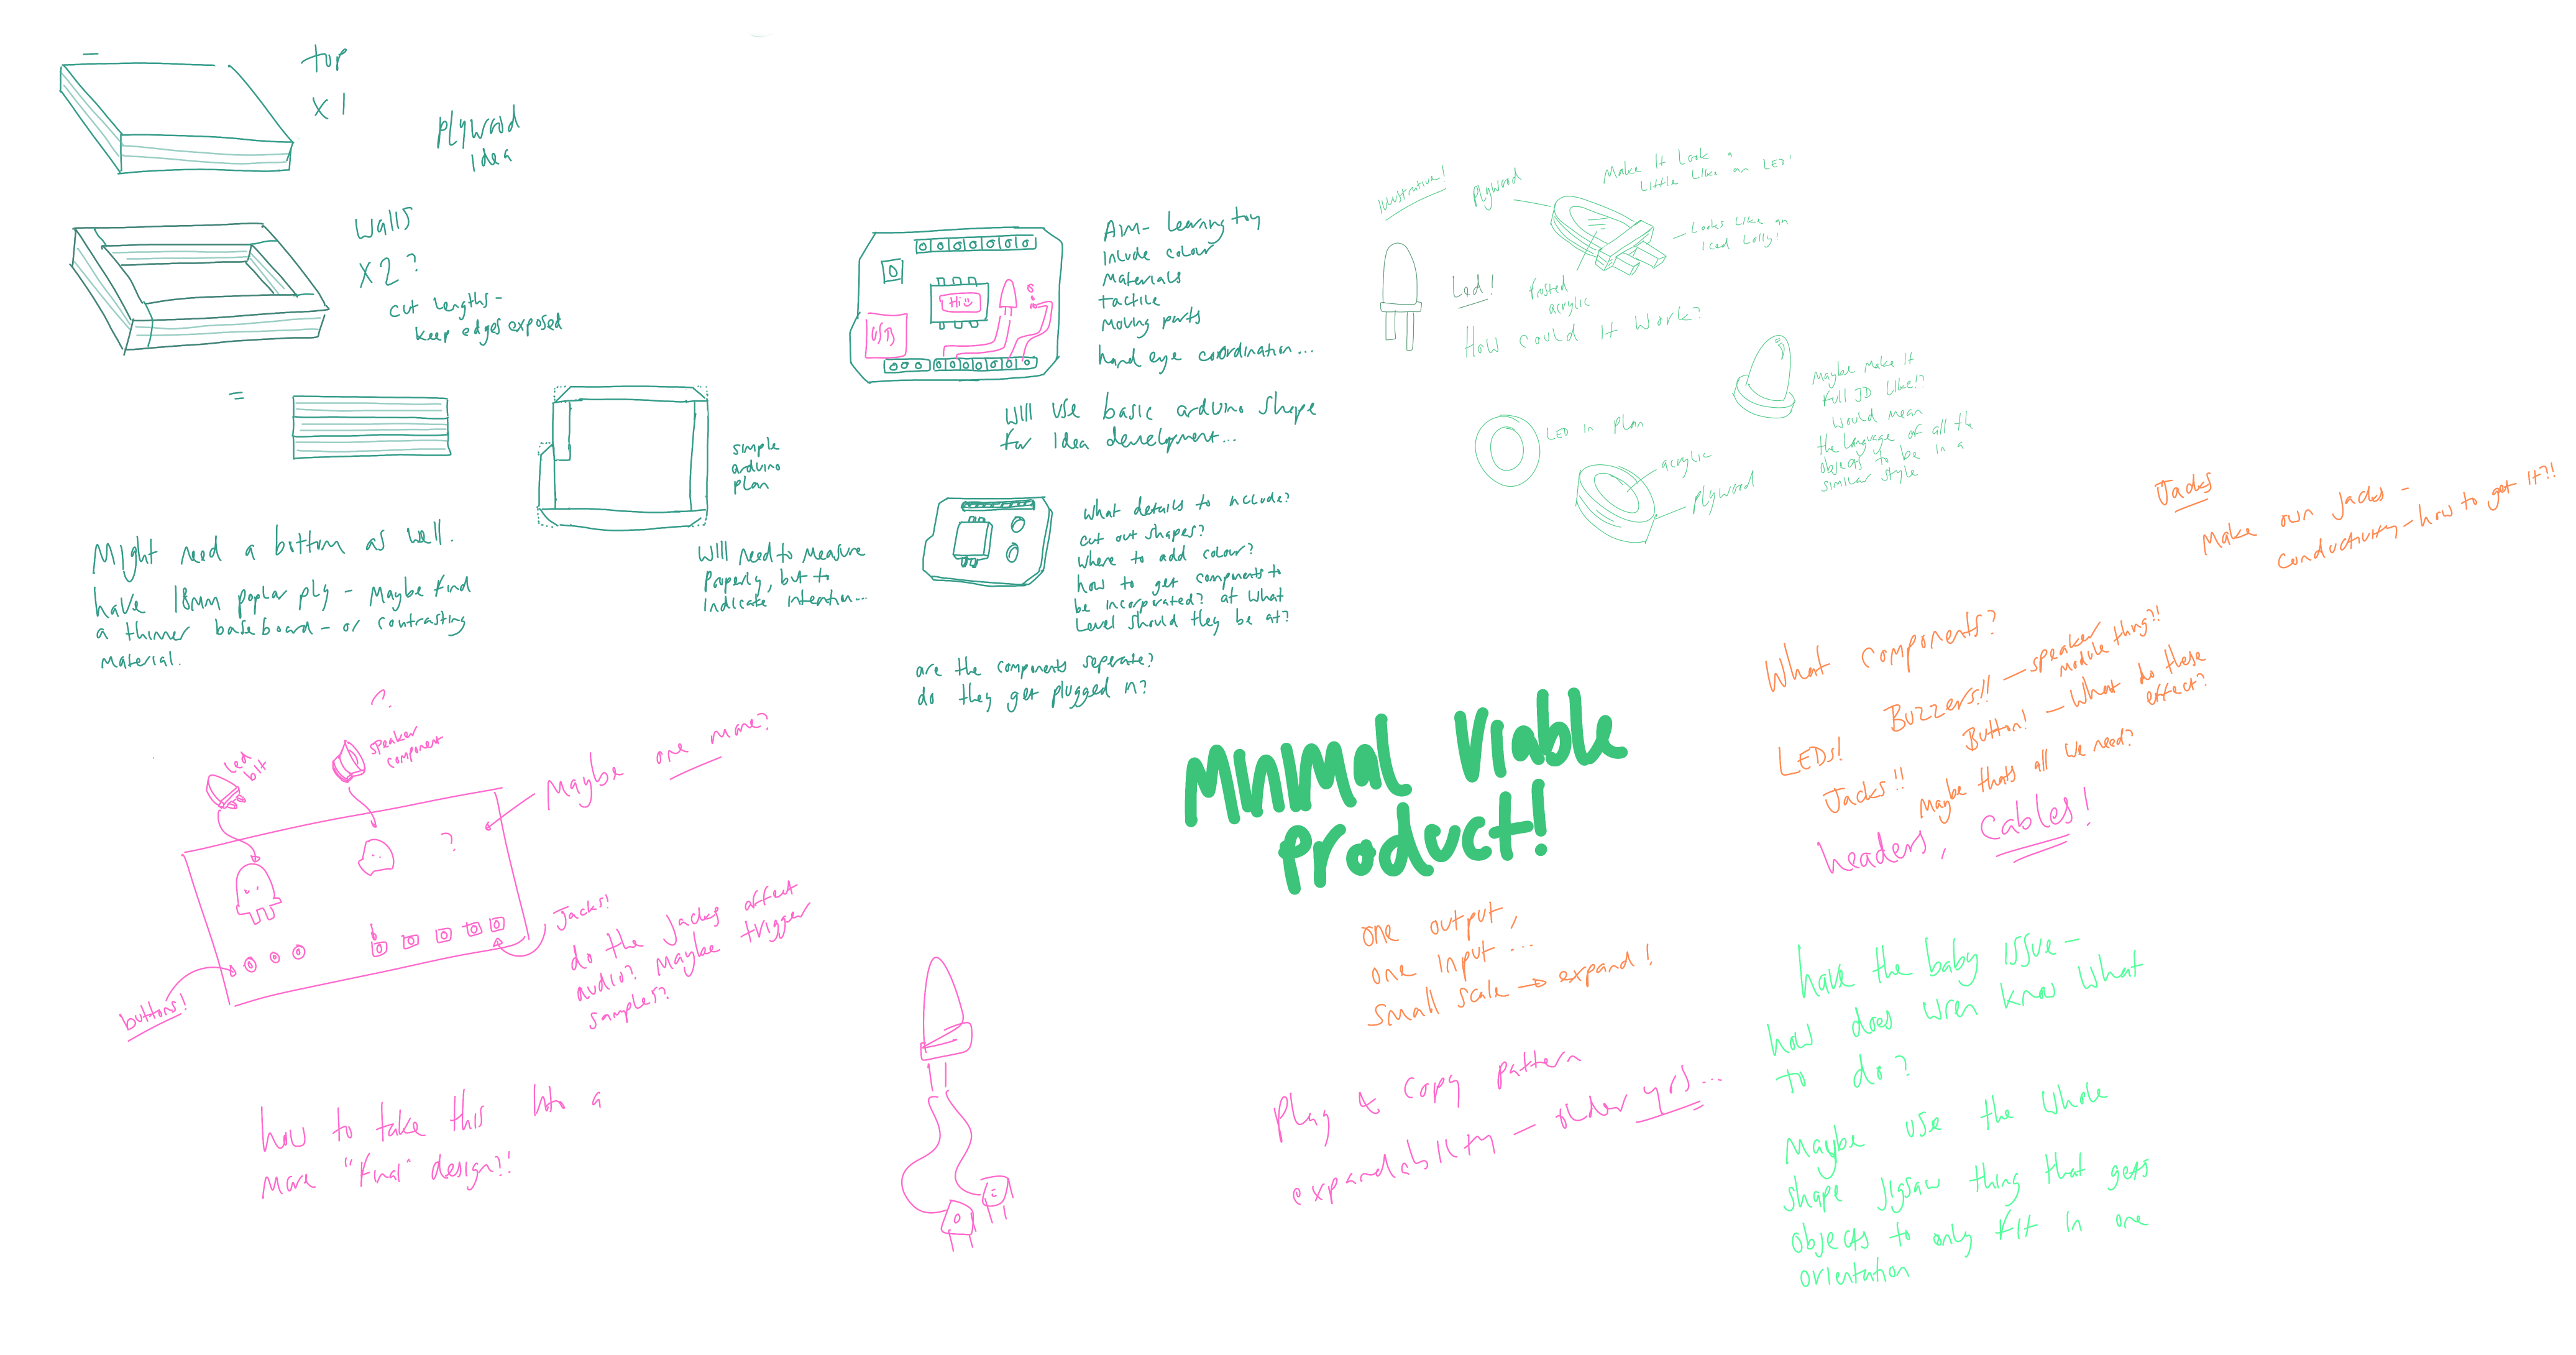
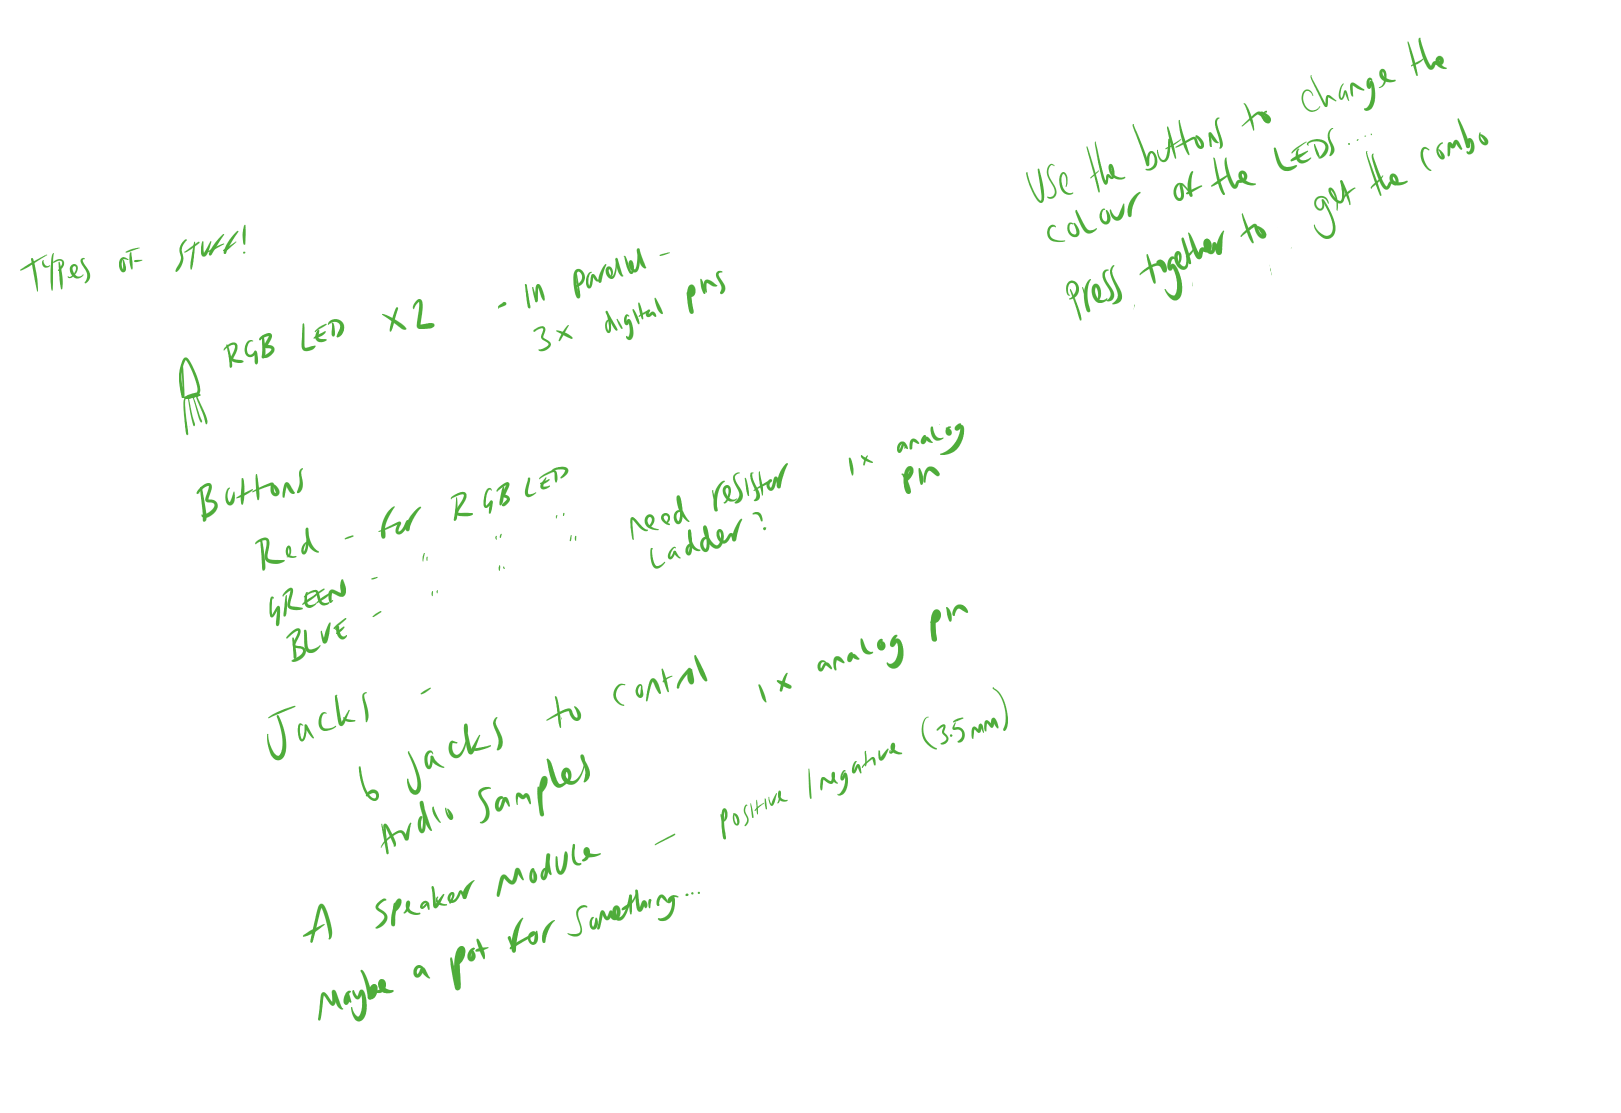
After initial research on children’s activity boards, I began to think about a style that I wanted to develop – a lot are space / underwater themed, bright and colourful. After a few design sketches and with how I might get the interaction I want – the idea of a scale Arduino Uno could be a fun way of bringing the project to life. The inputs I decided would be a set of buttons and a set of jack plugs. The outputs would be light and sound.
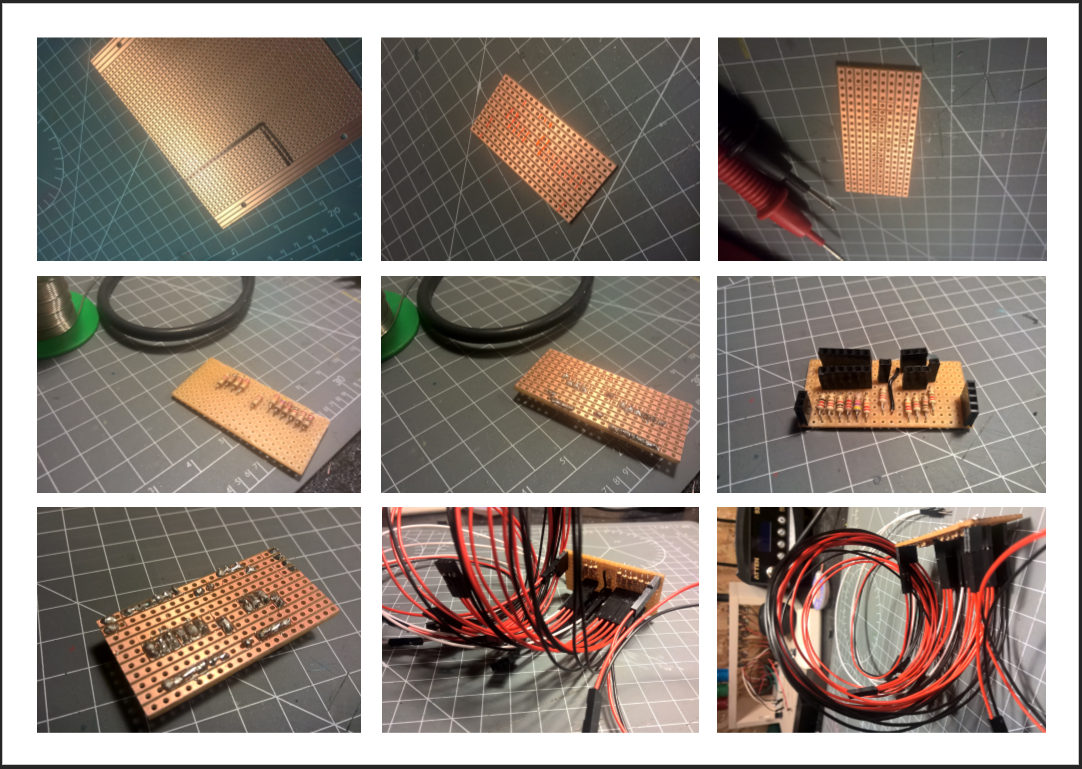
After completing the classwork, I began to create the prototype. Souring the parts was a simple process – a bit of online shopping. The project didn’t work for the class demo which was a problem!
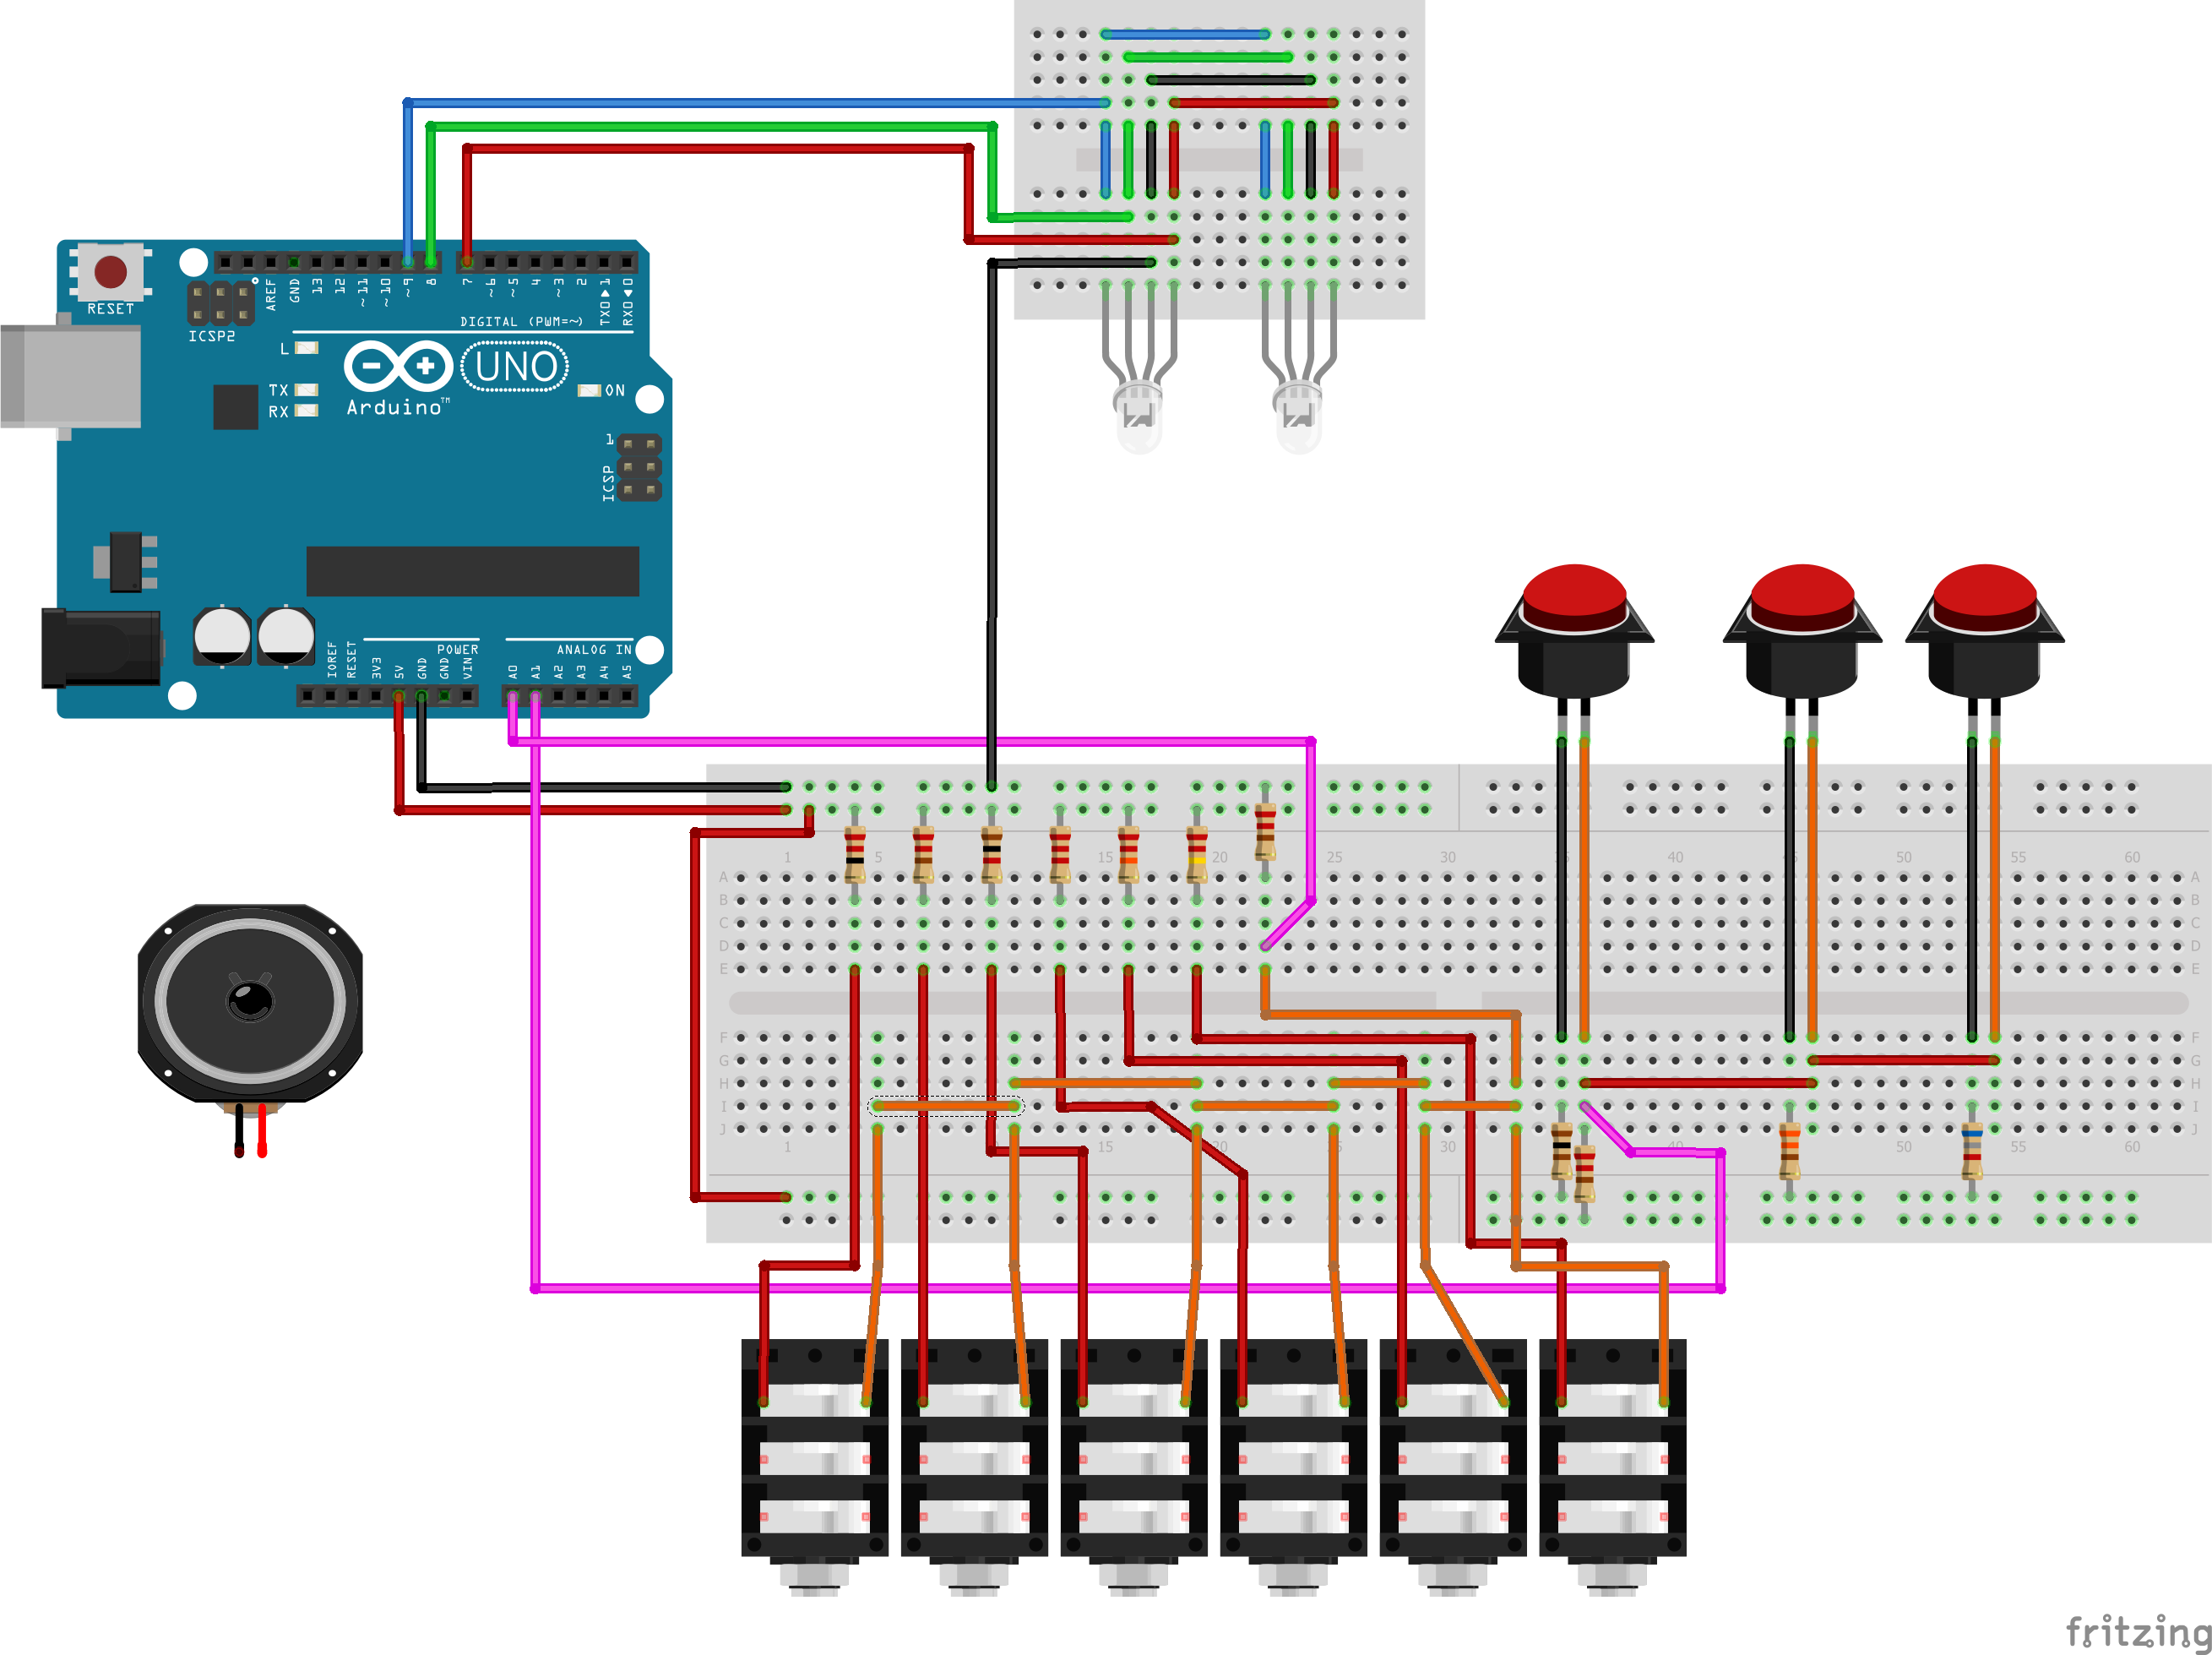
The prototype was working correctly by the end of week 8, with sound(WAV) coming from the AdaFruit WaveShield when a jack was plugged into their sockets. The LED would illuminate when a button is being pressed. The WaveShield uses a bunch of the pins that Arduino has on offer – leaving only 4 digital pins, but all analogue pins, however I wanted 6 pins for the sockets and 3 for the buttons.
This lead me to use resistor ladders for both inputs. As this was something that we were introduced to in class, I was happy to utilise it. After some trial and error, I got the values by reading the serial via Arduino. I could use the same 3 resistors for the buttons and the switches, then an additional 3 for the switches for the full 6.
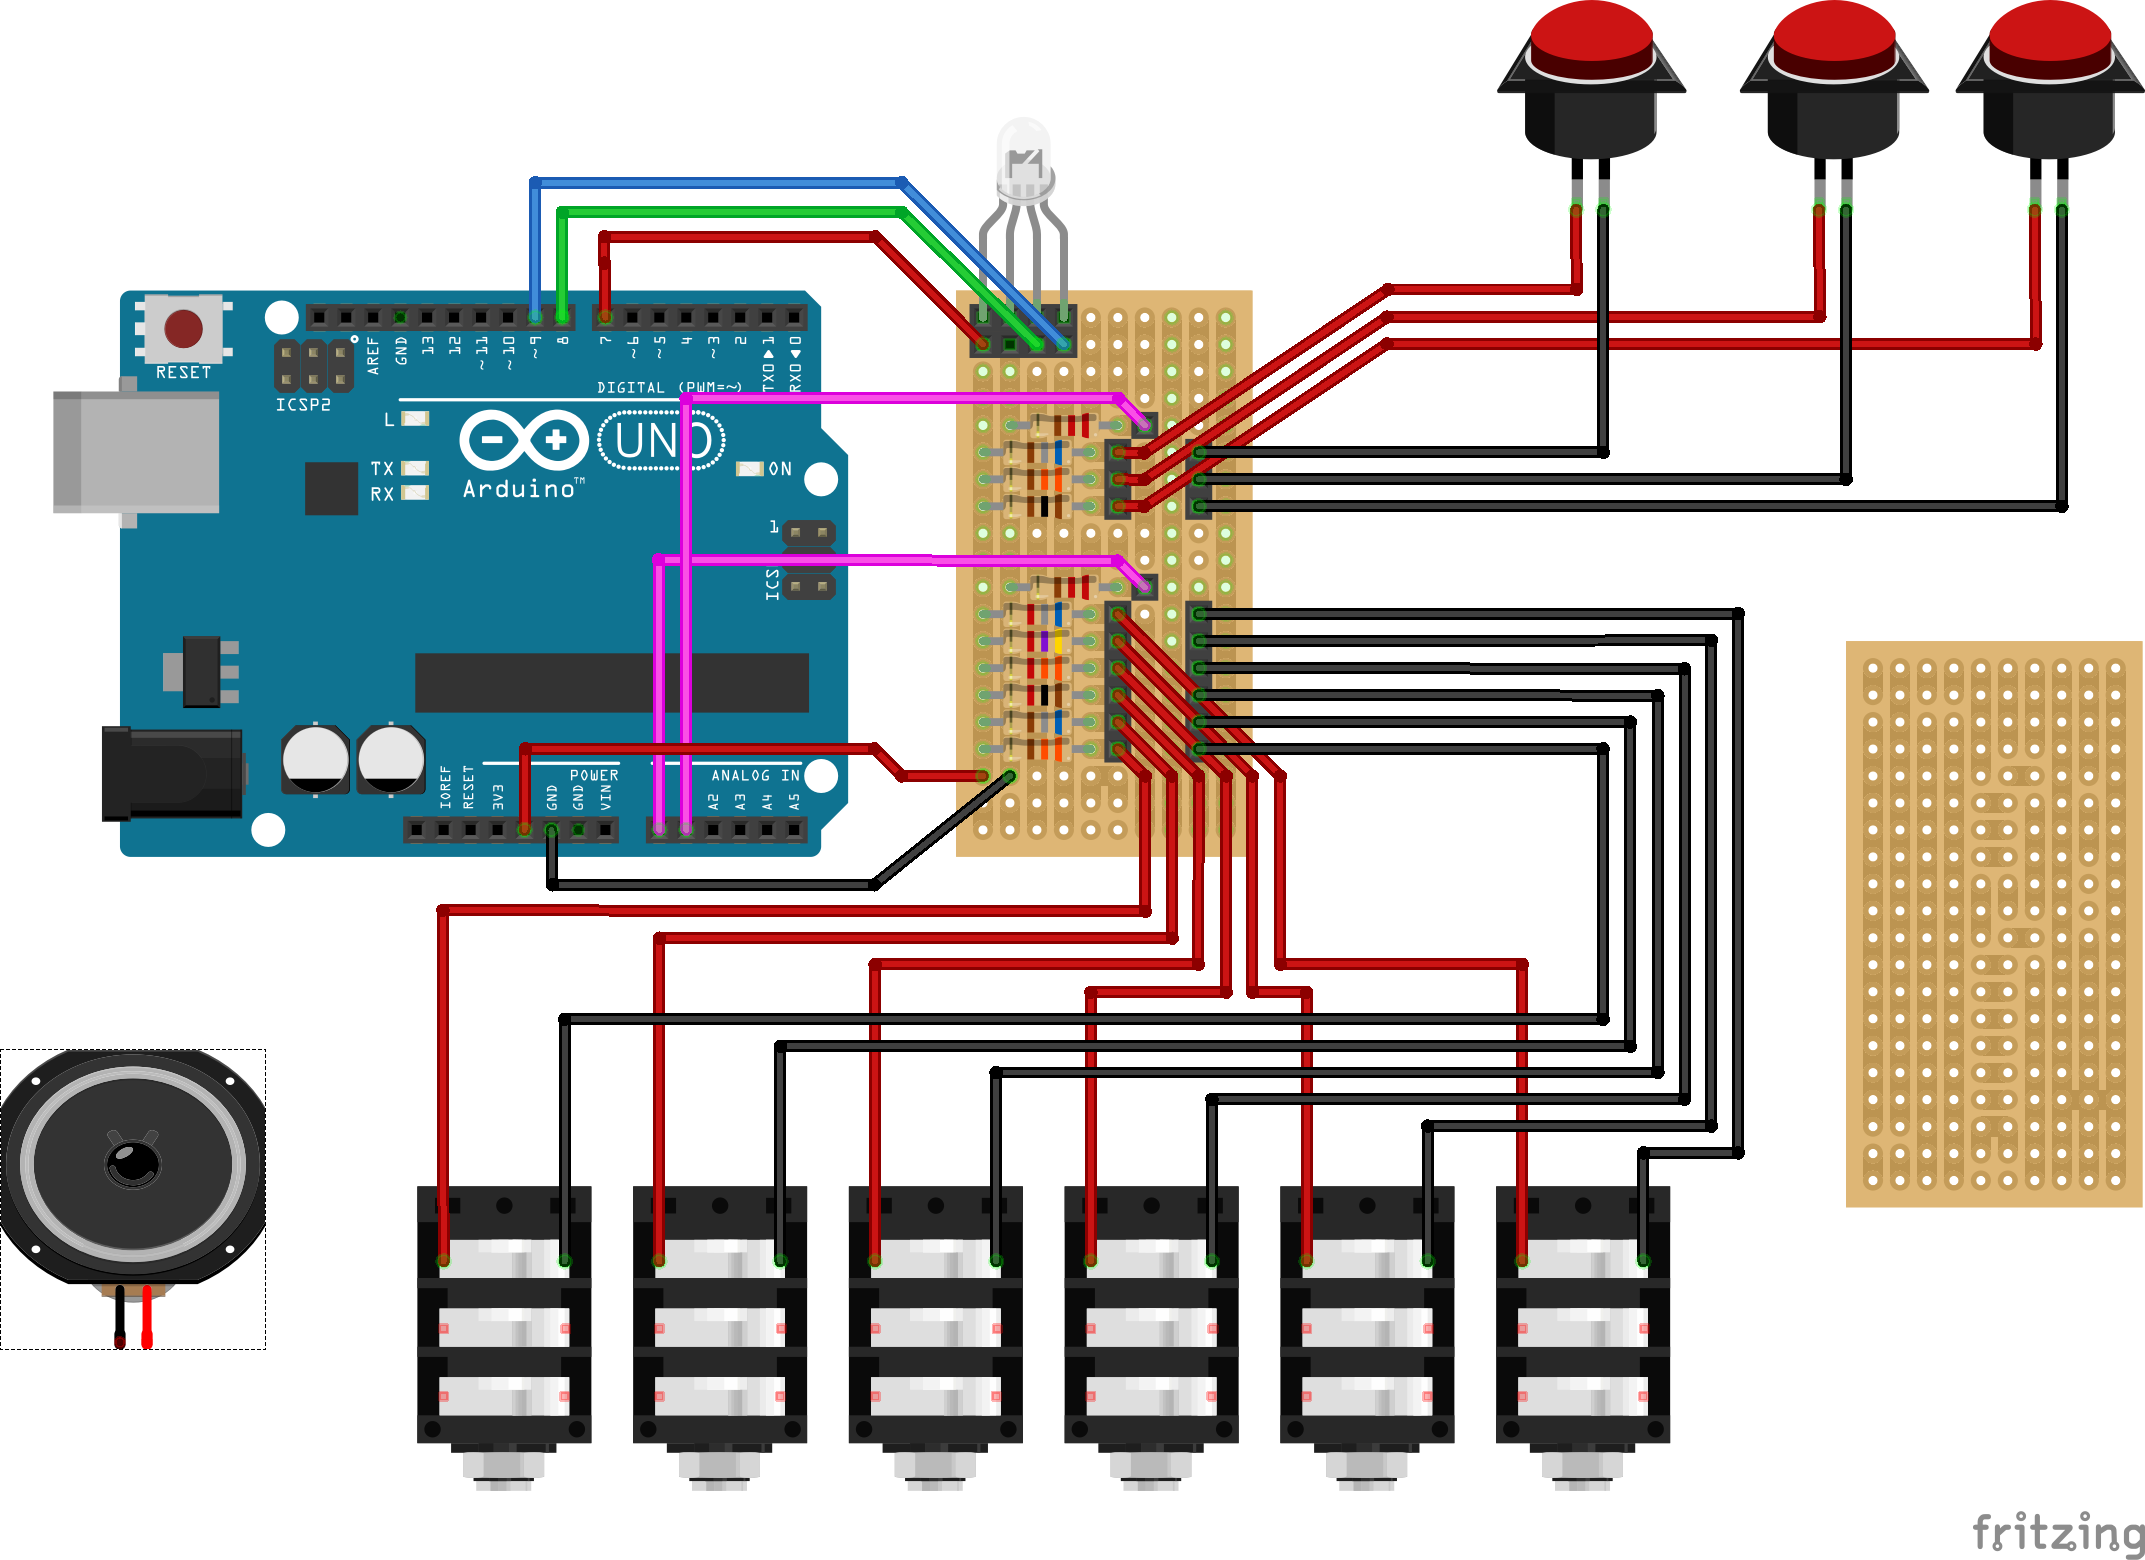
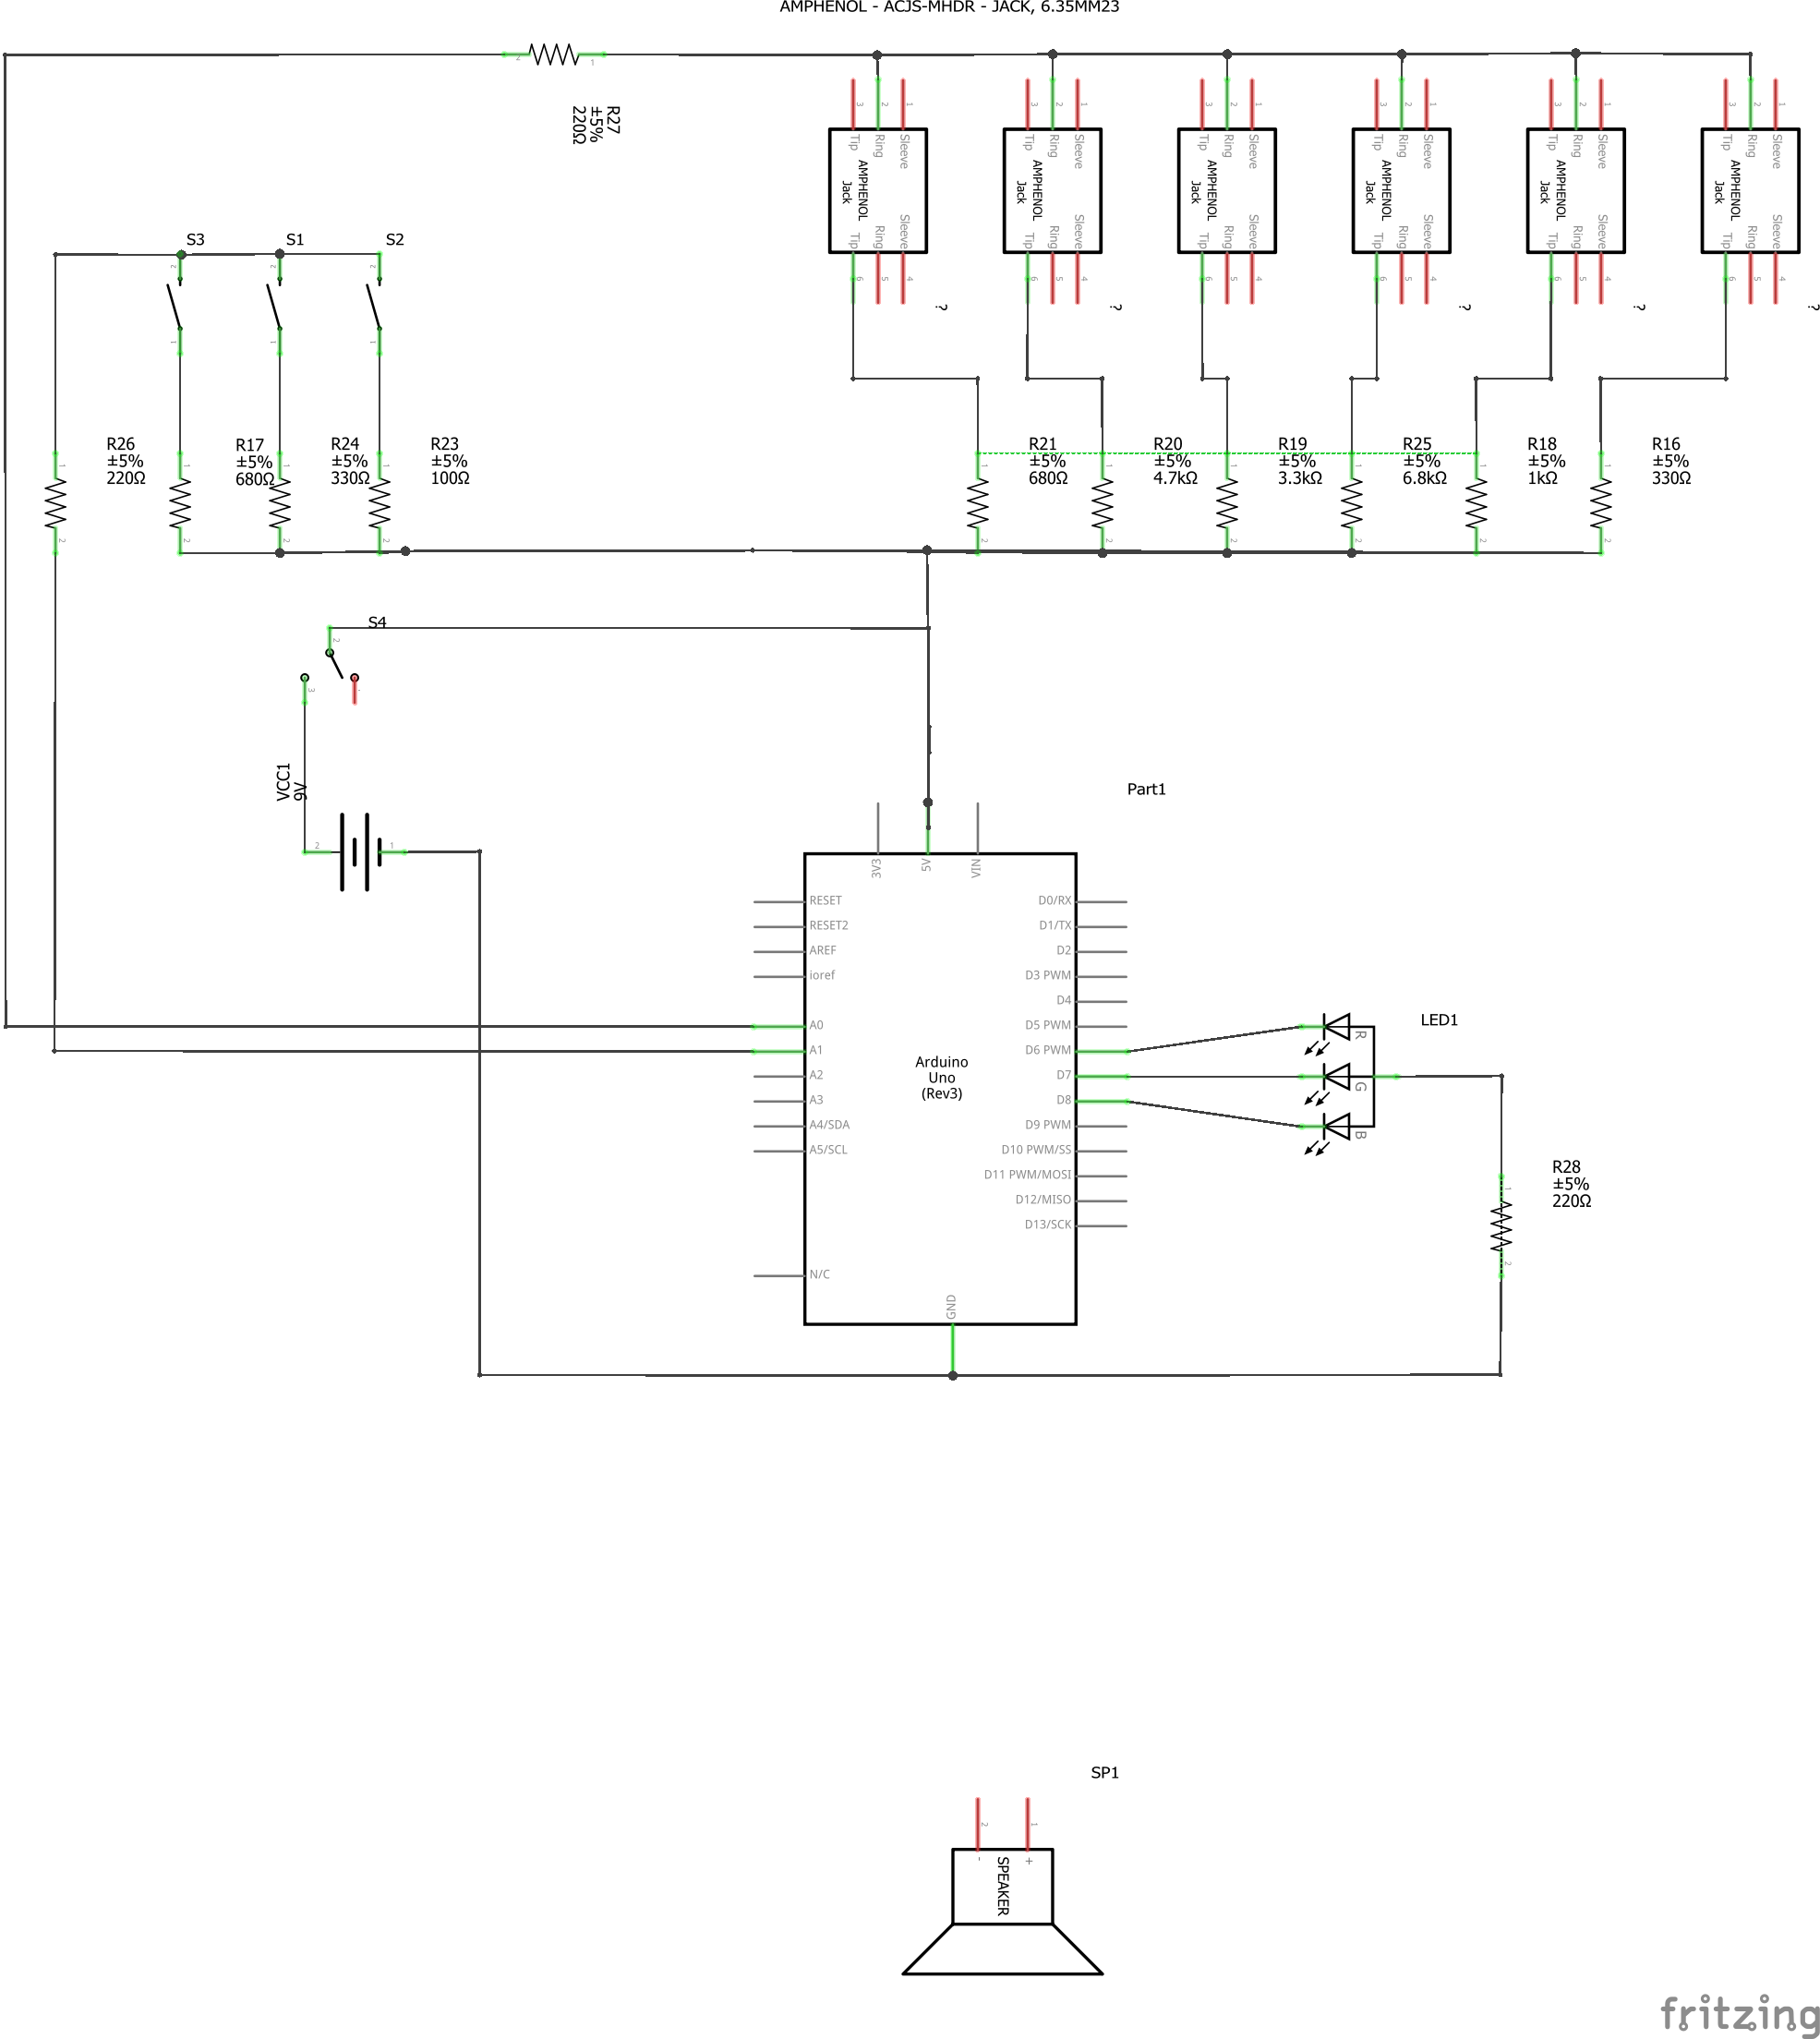
The RGB LED was being a pain, and refusing to work as simply as I wanted it to be. That lead me to use the Neopixel library and a pre-assembled driver board for the LED. After about an hour of work the buttons worked using if / else statements.
The WaveShield has its own library and example files -which I used. I had to amend the sketch a little by adding if statements for the readings on A0 to play the audio files one to six.
After a bunch of sketches, I had the initial idea set.
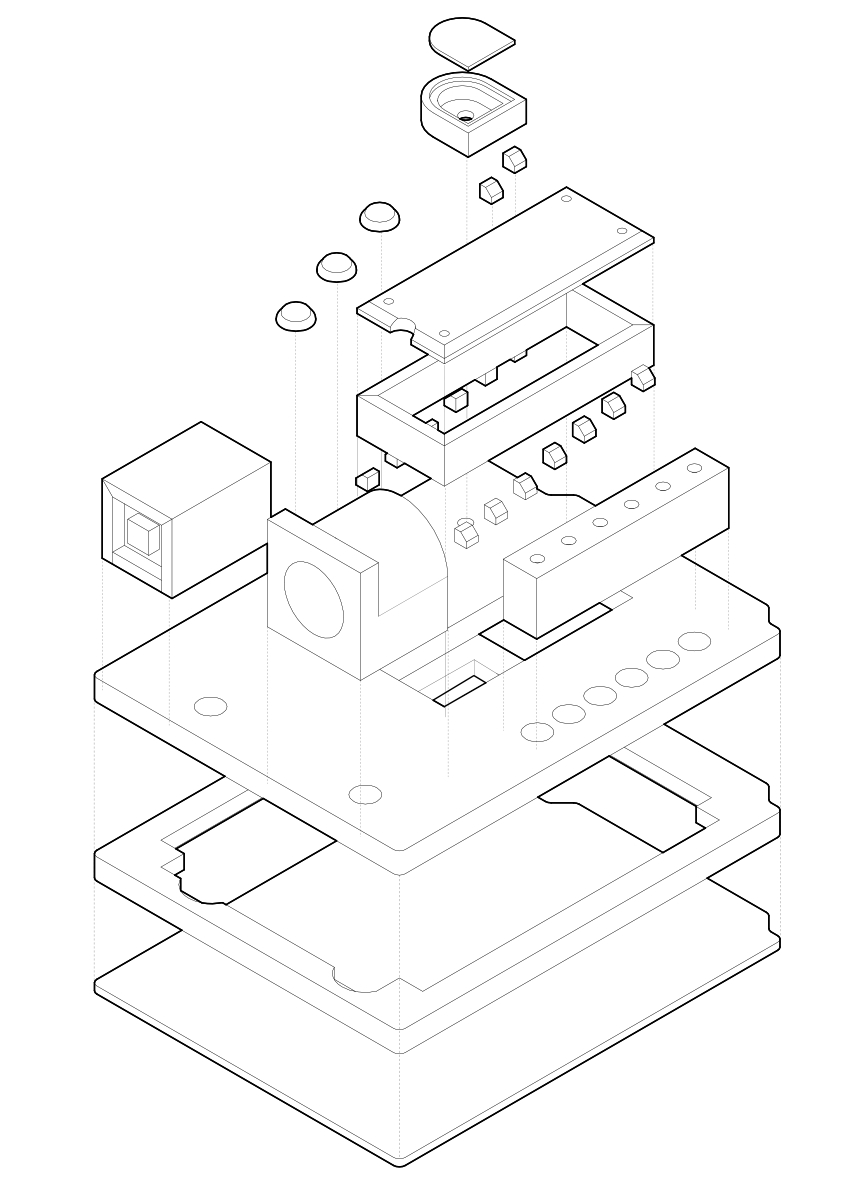
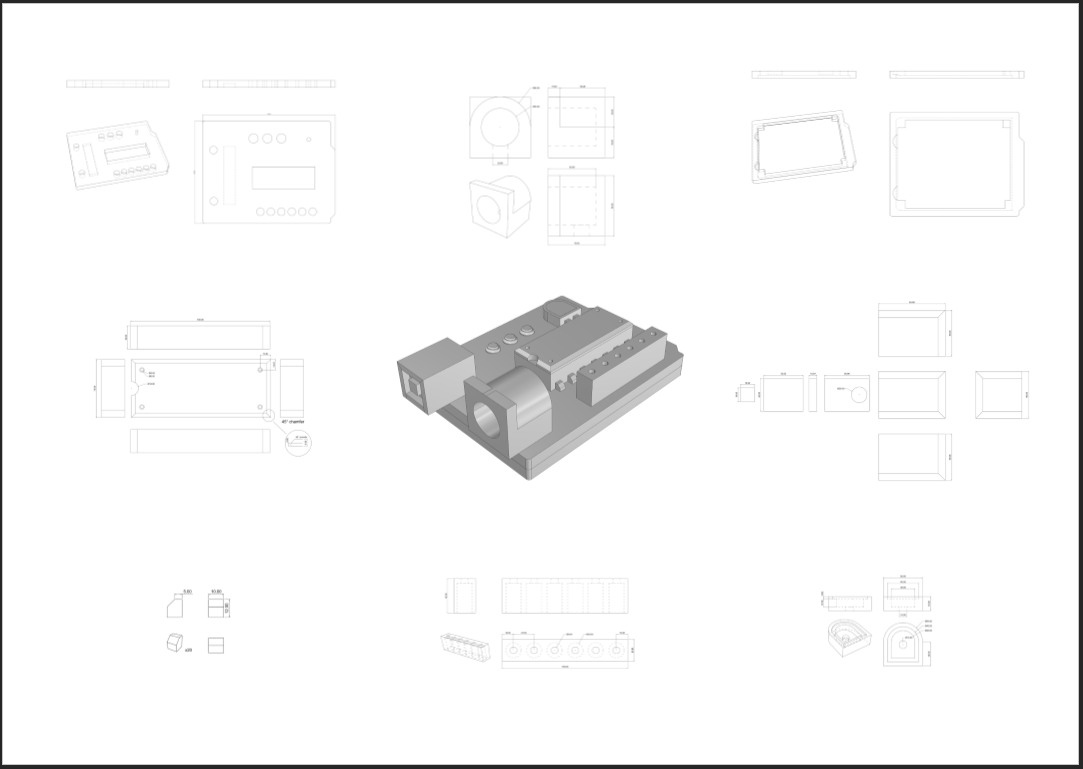
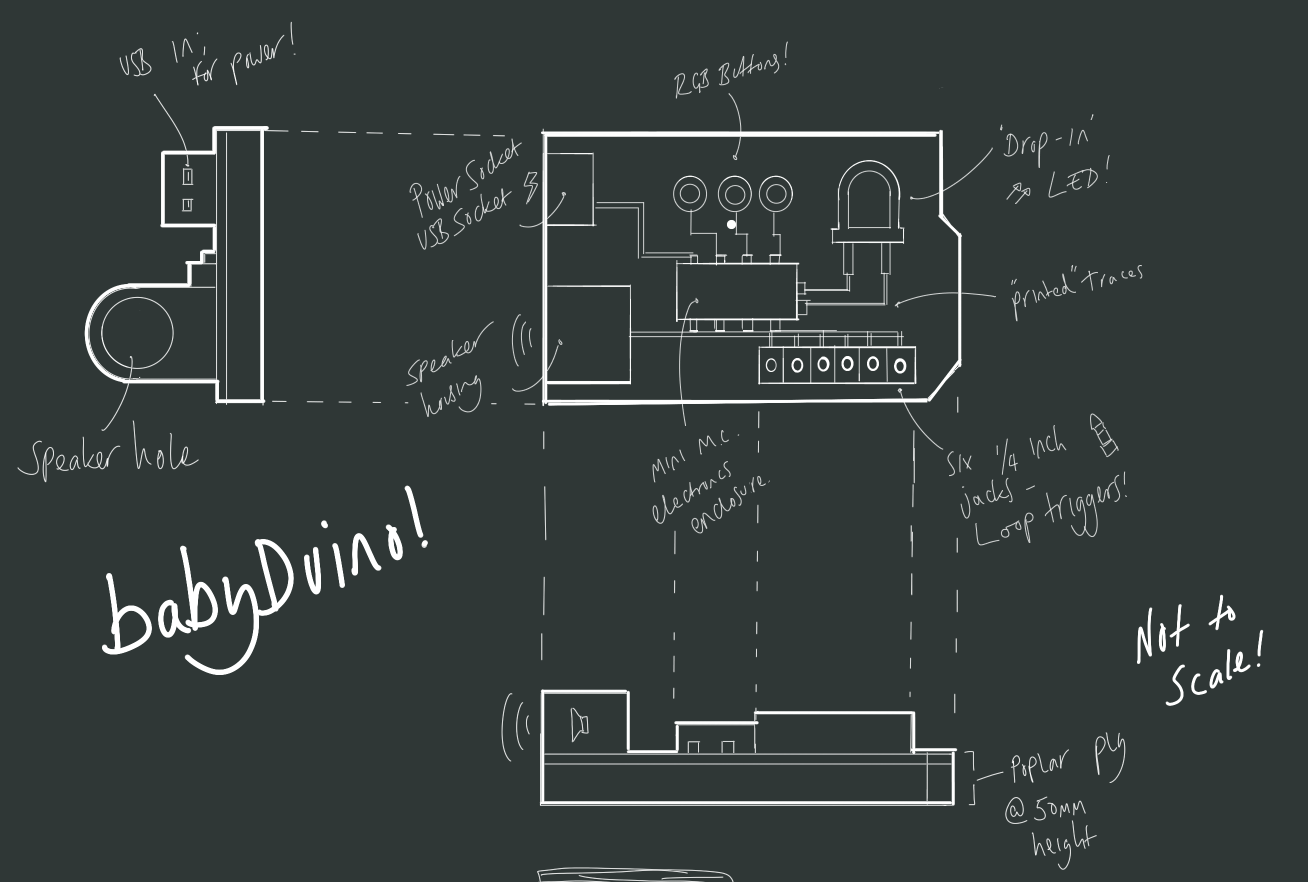
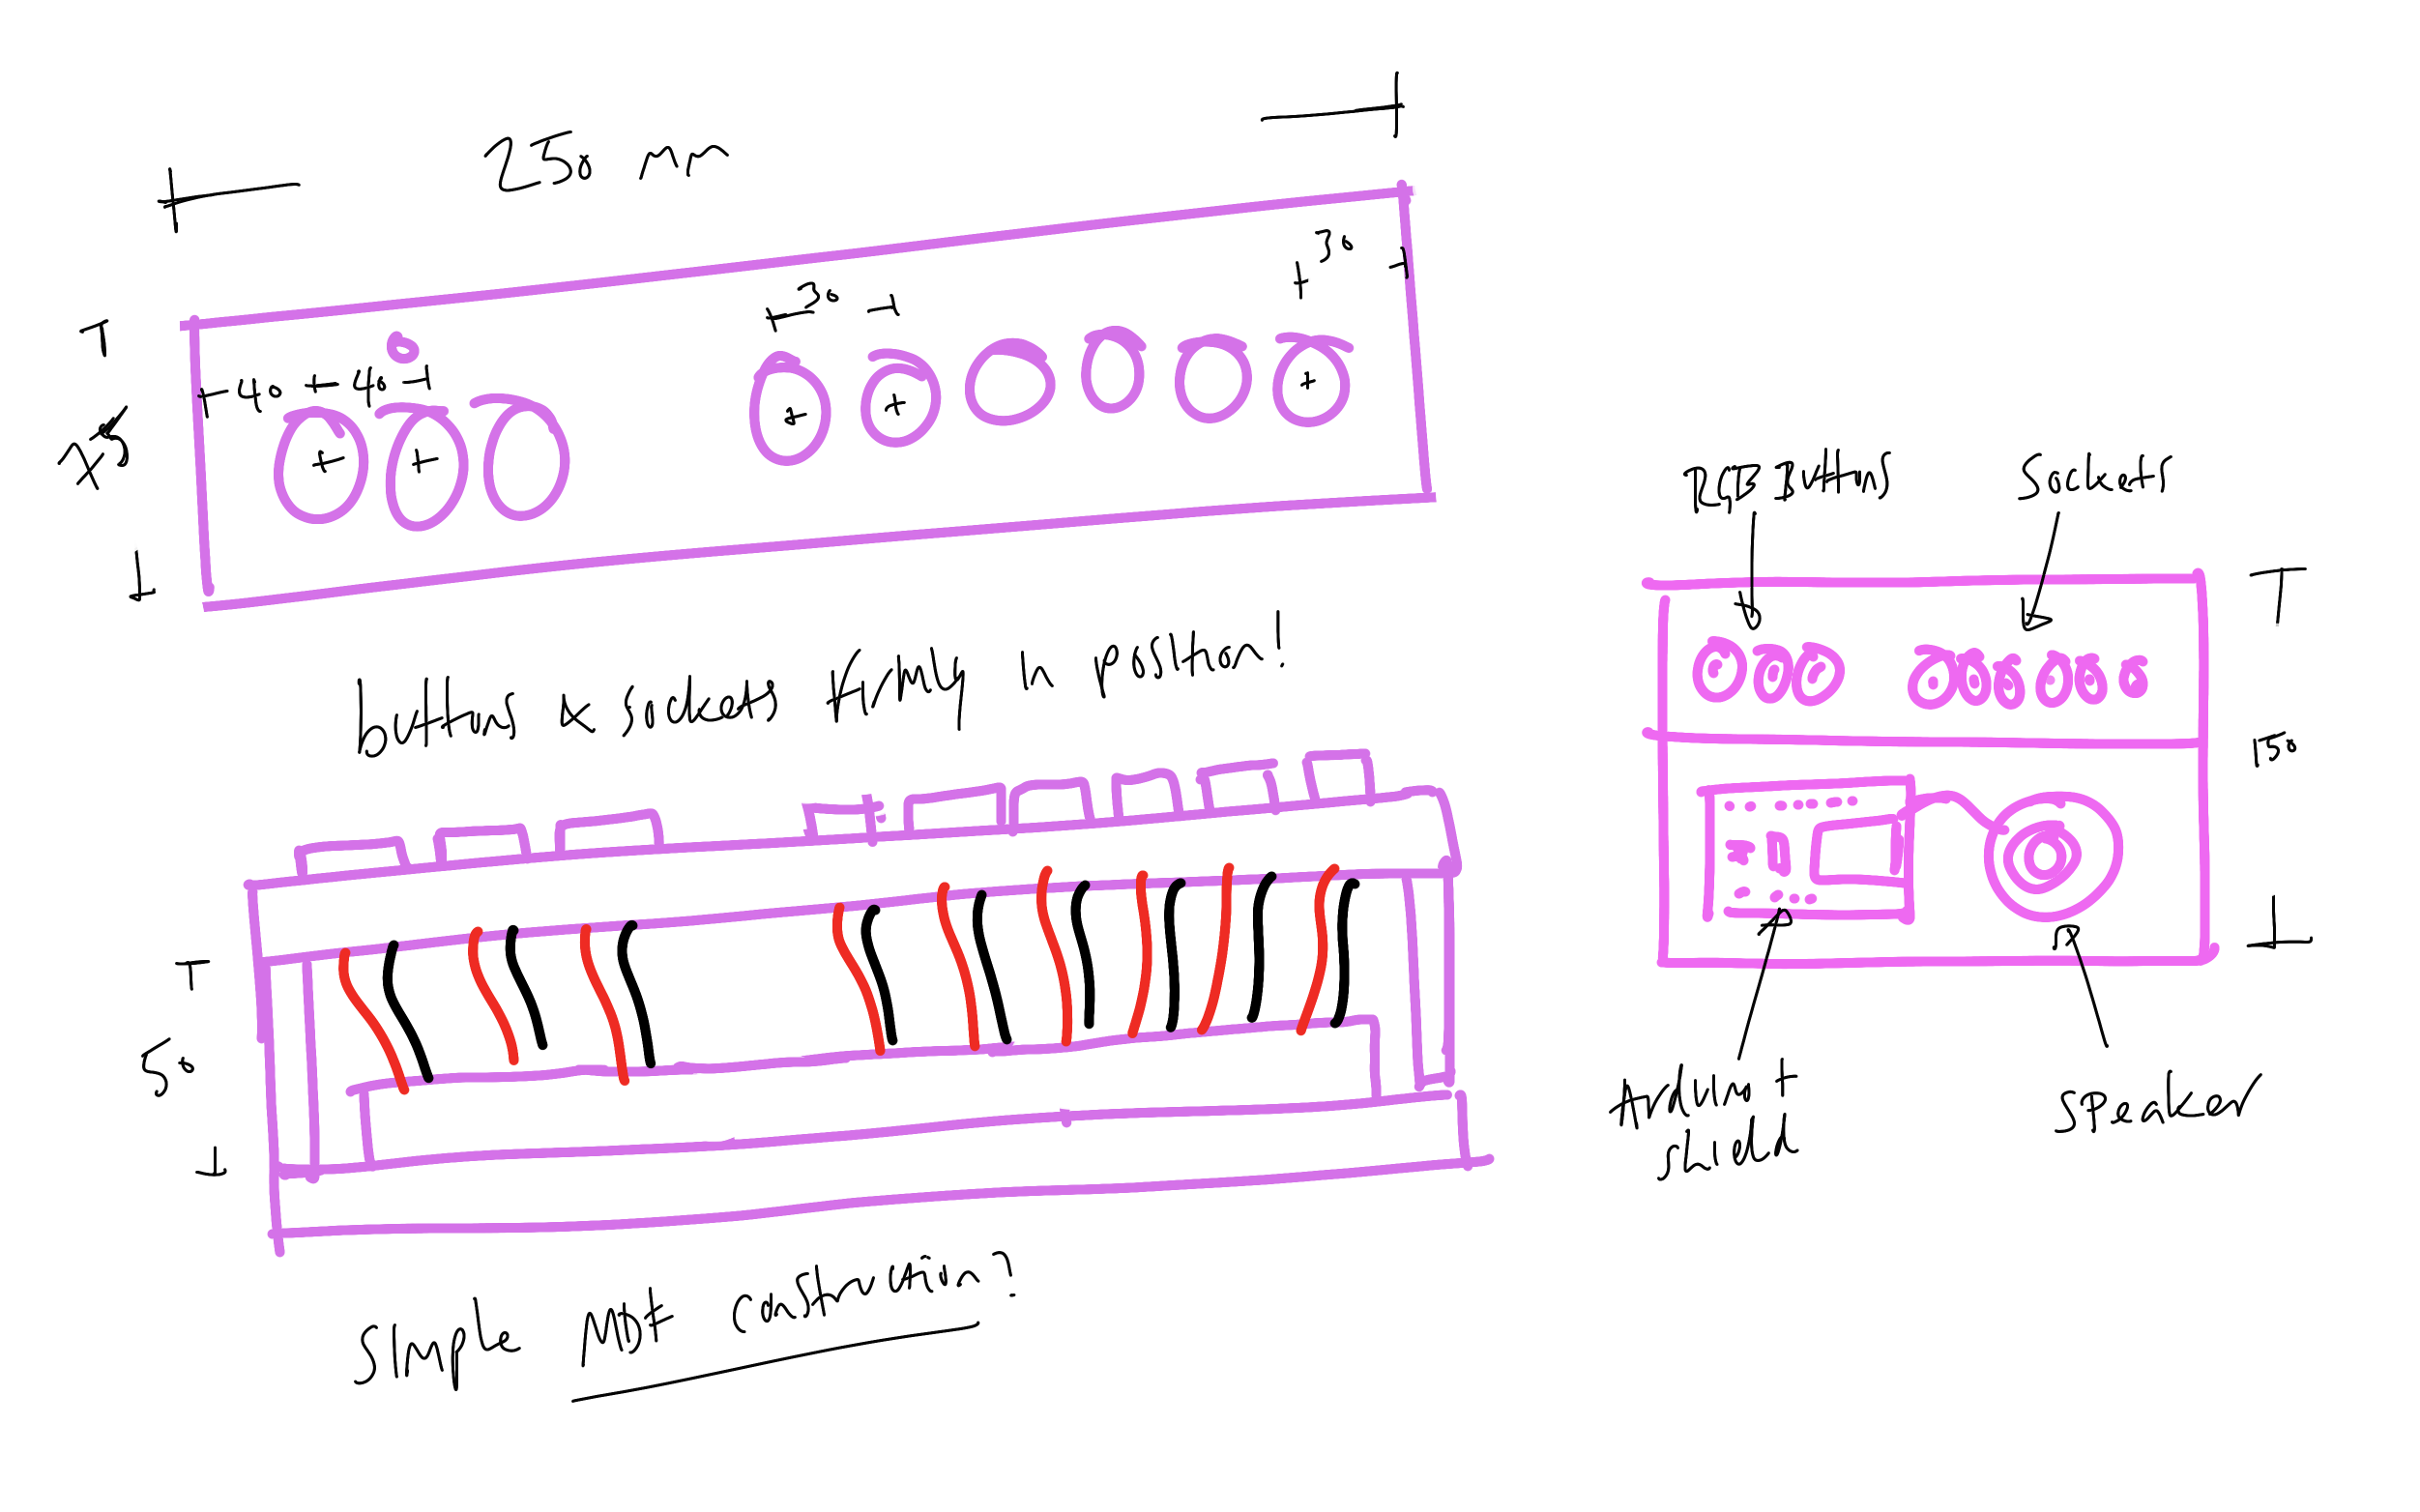
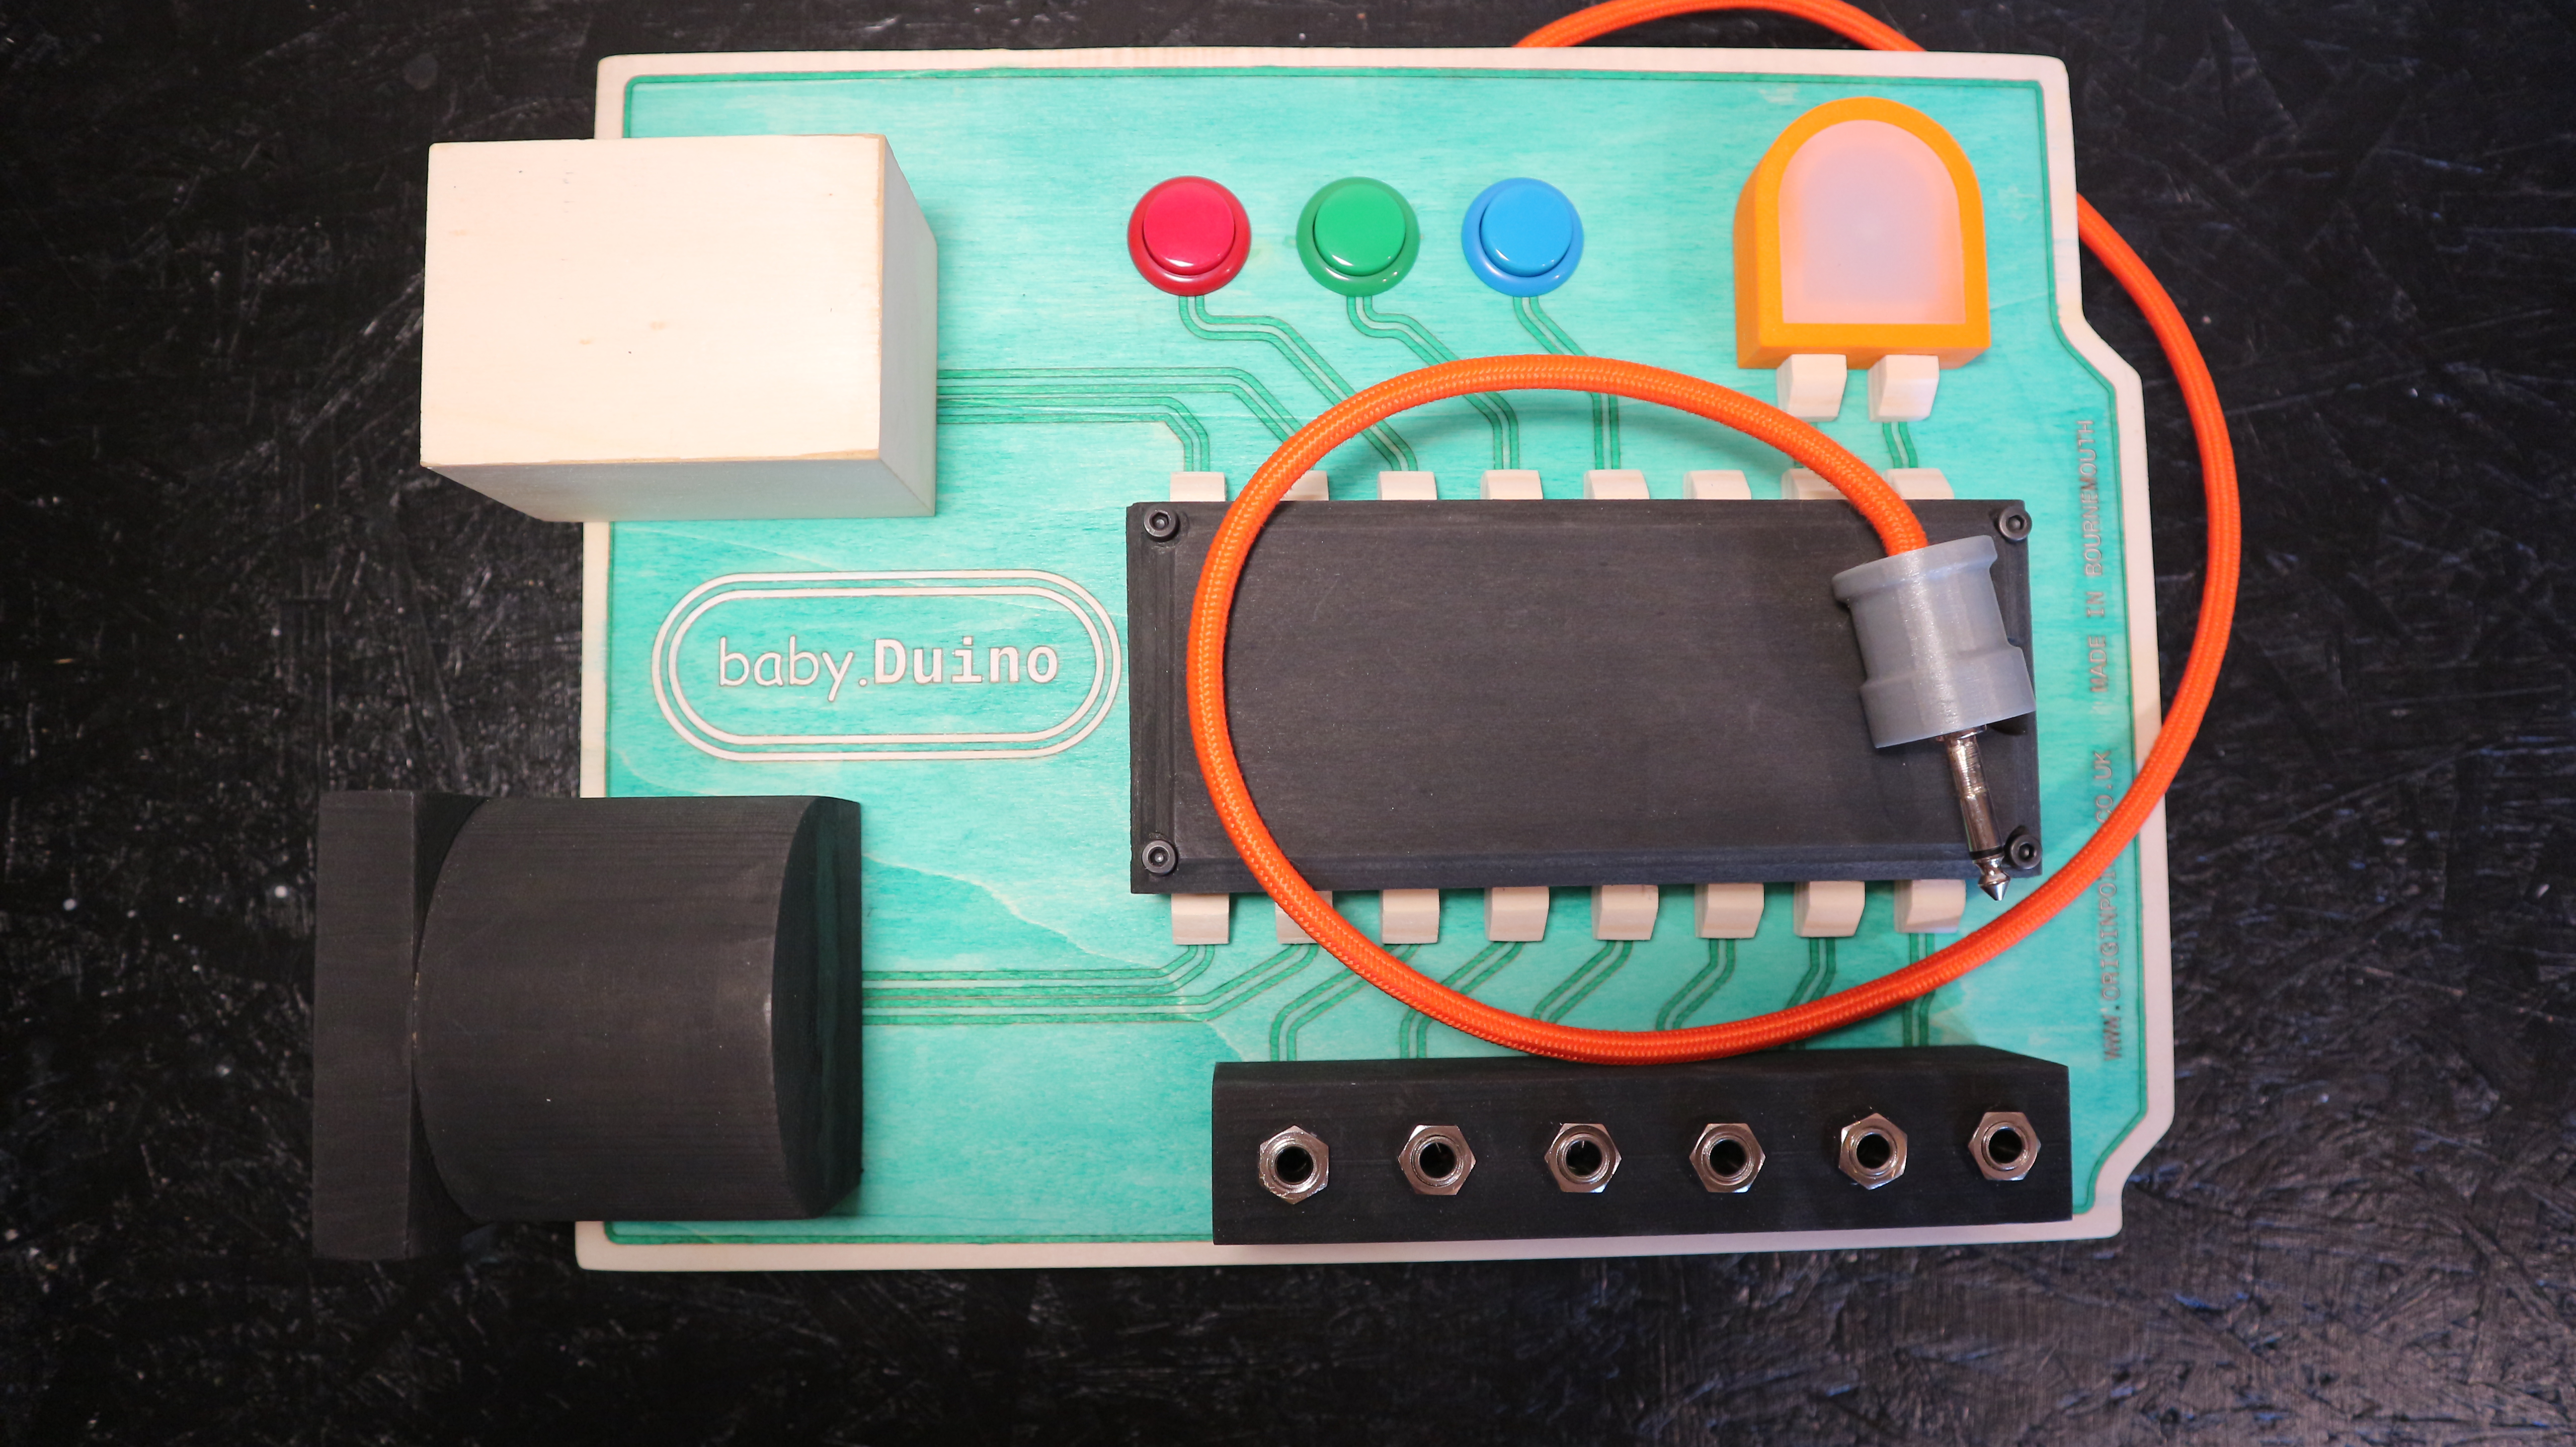
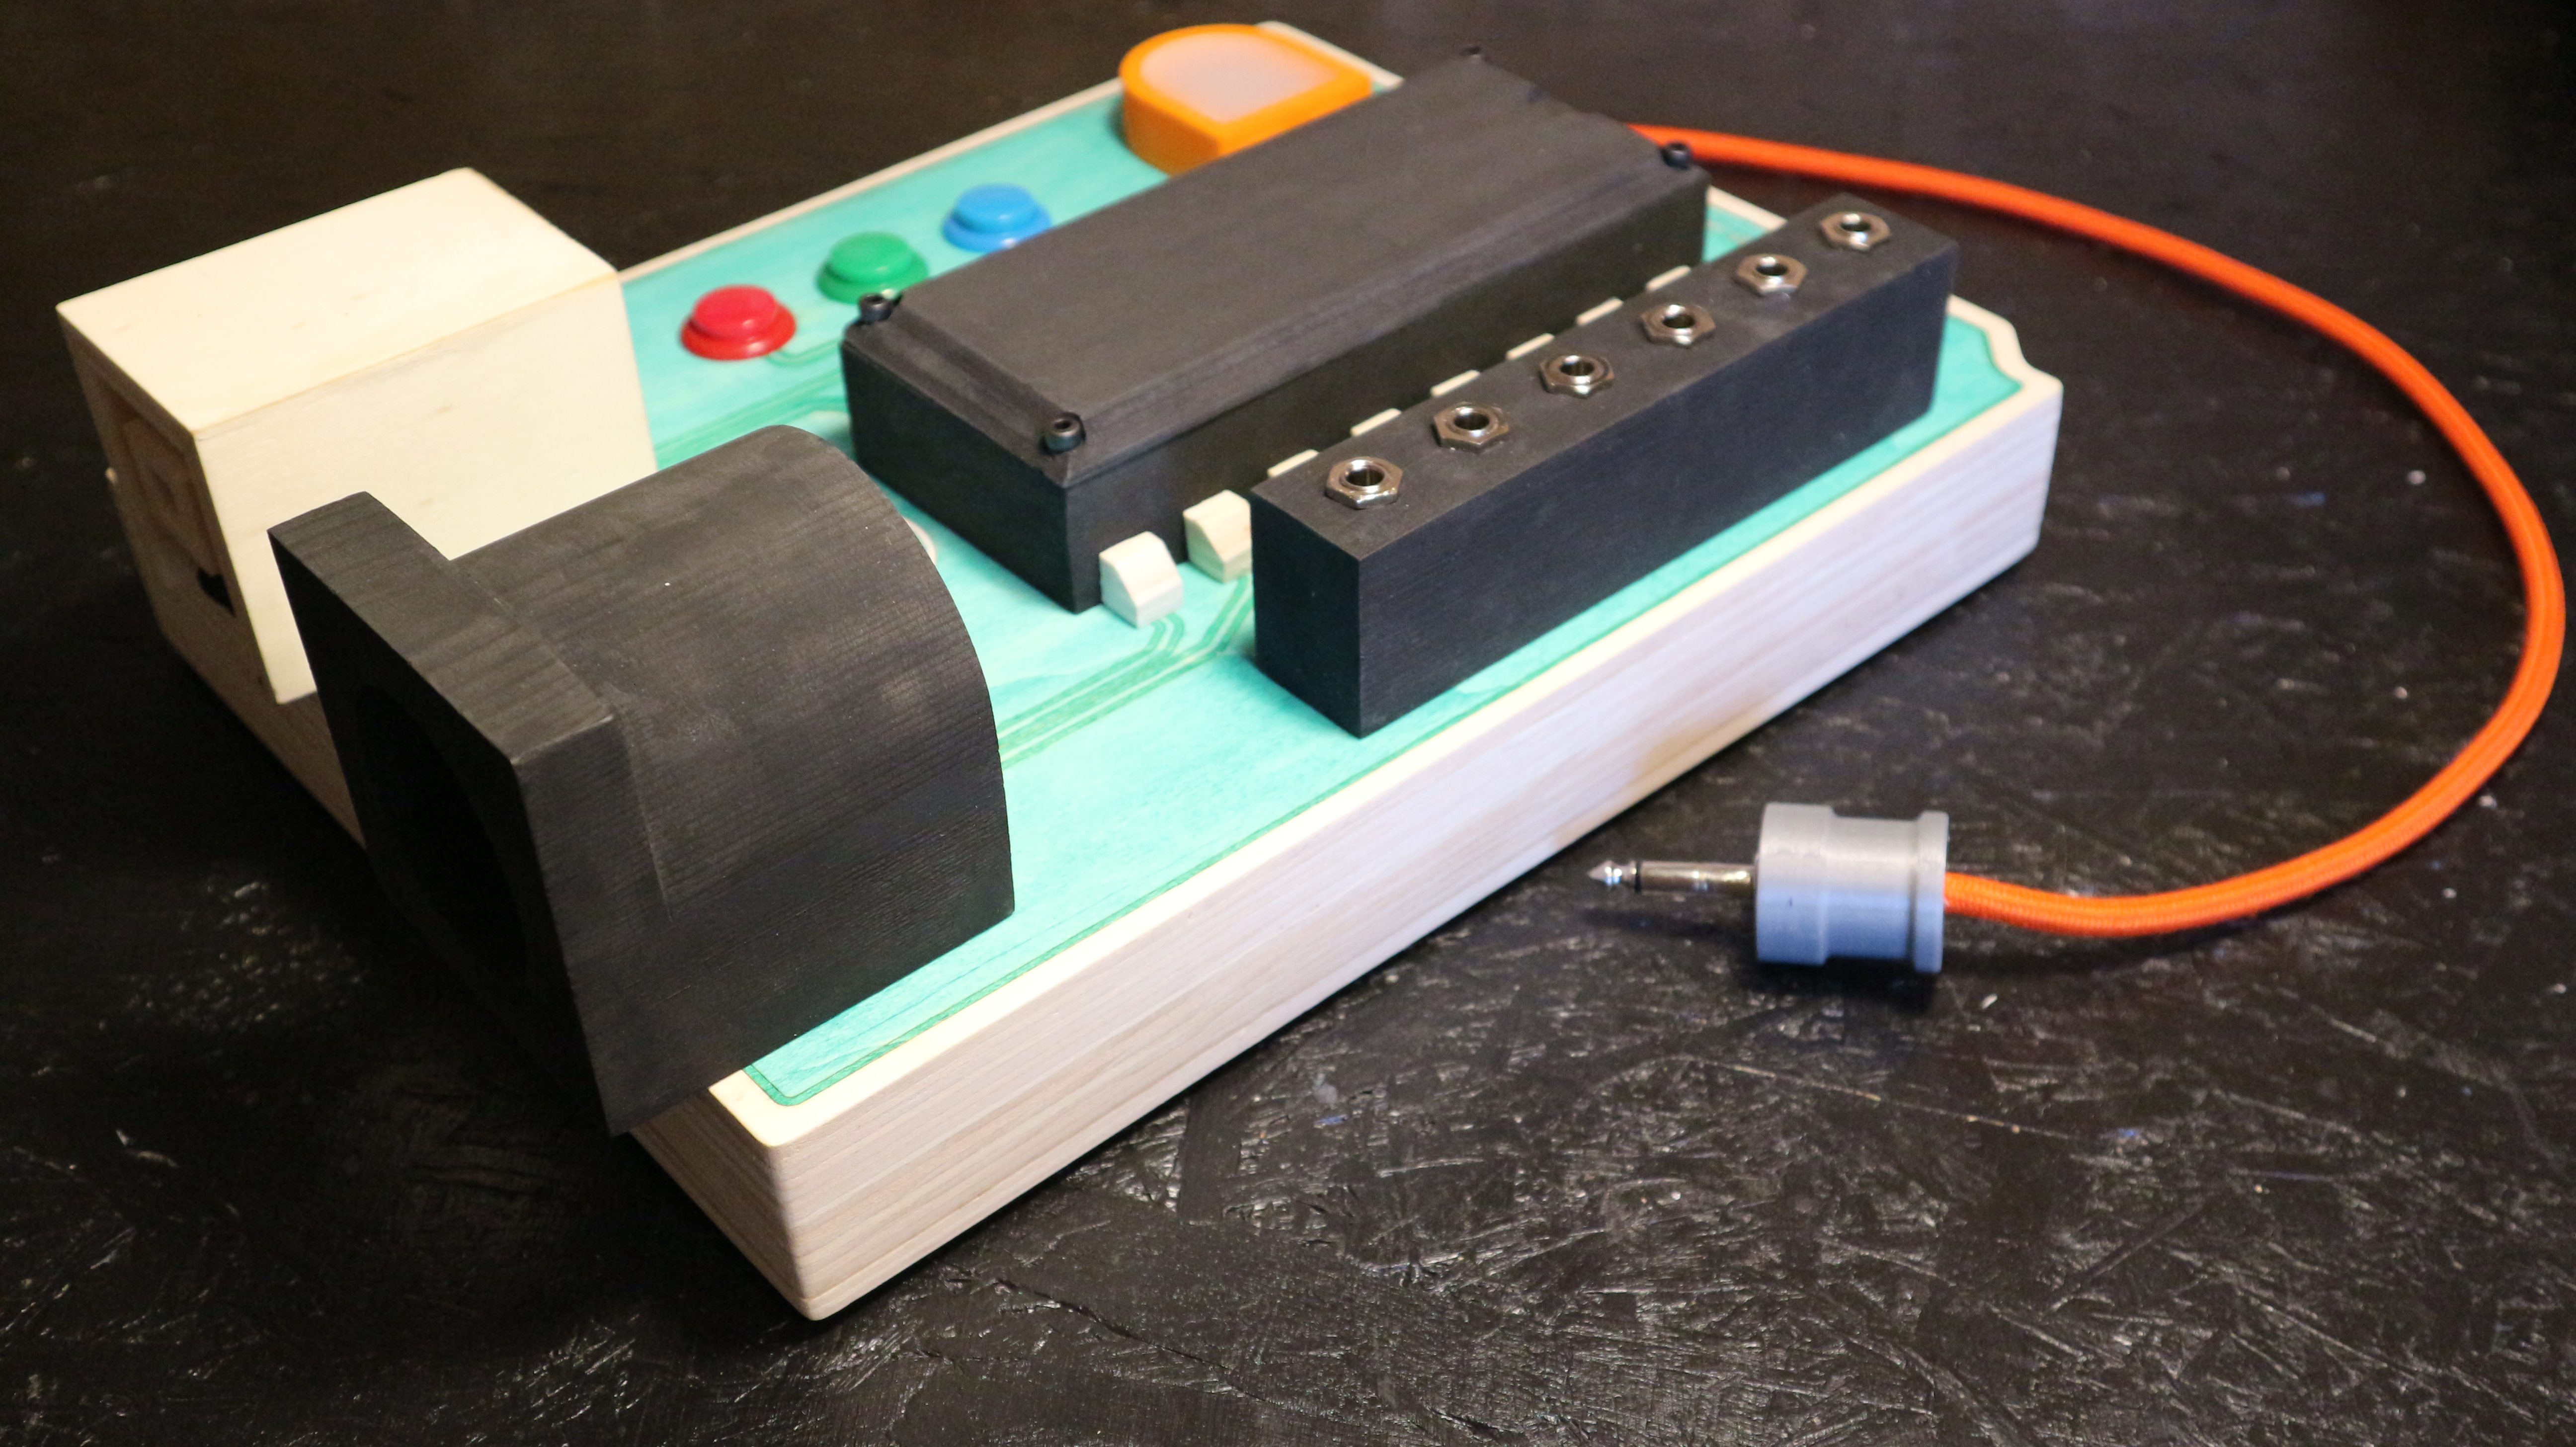
I drafted the object in Rhino, I went for scale 5:1 (five times bigger) – but then certain elements were out of scale after that. I wanted to keep the notion of using an Arduino despite it being simplified / abstracted. I kept the ‘headers’ for the inputs which I used for the jack sockets. For the LED I had the 3 buttons and LED in alignment along the top. The Arduino was housed within the IC, which is out of scale. The speaker was housed in the power socket – the speaker is a very cheap portable speaker – which needed only minor modification to fit.
I played around with the pattern of the board to illustrate that there are wires plugging into the components from the IC.


I wanted the material to be primarily wood – and not MDF. I used a lot of Poplar PLY, a lightweight alternative to Birch PLY, this made the board, the IC and the USB housing. I used Pine for the headers and the power socket as they both required additional work after shaping.
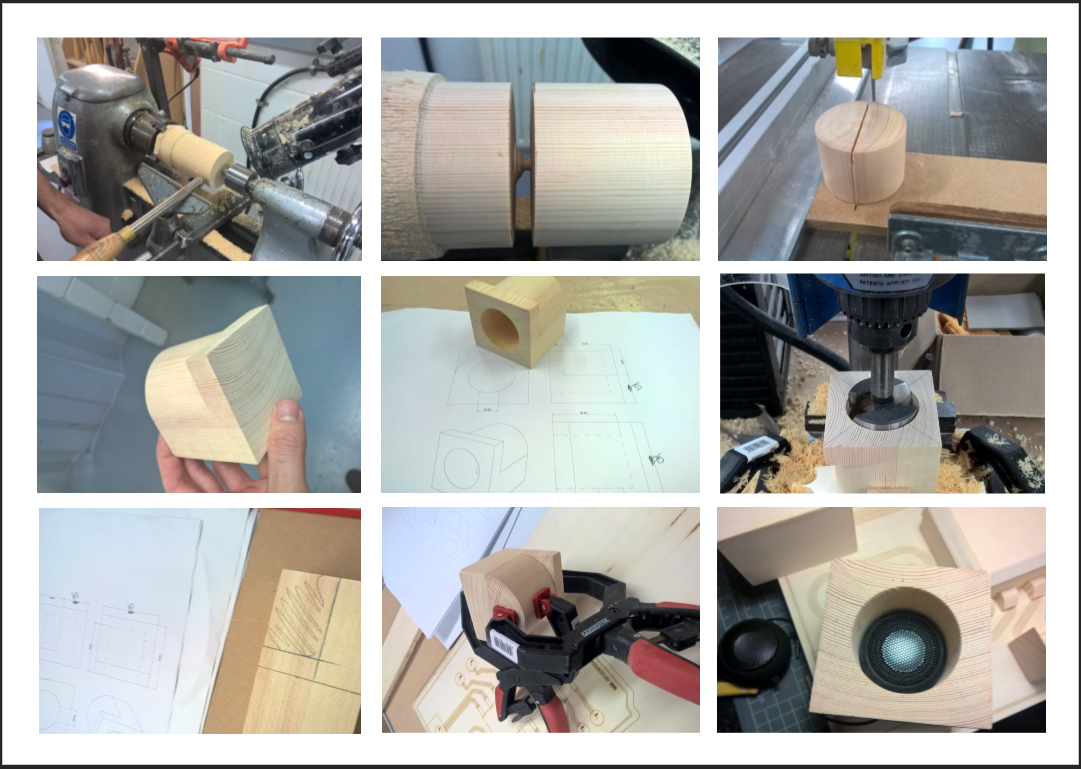
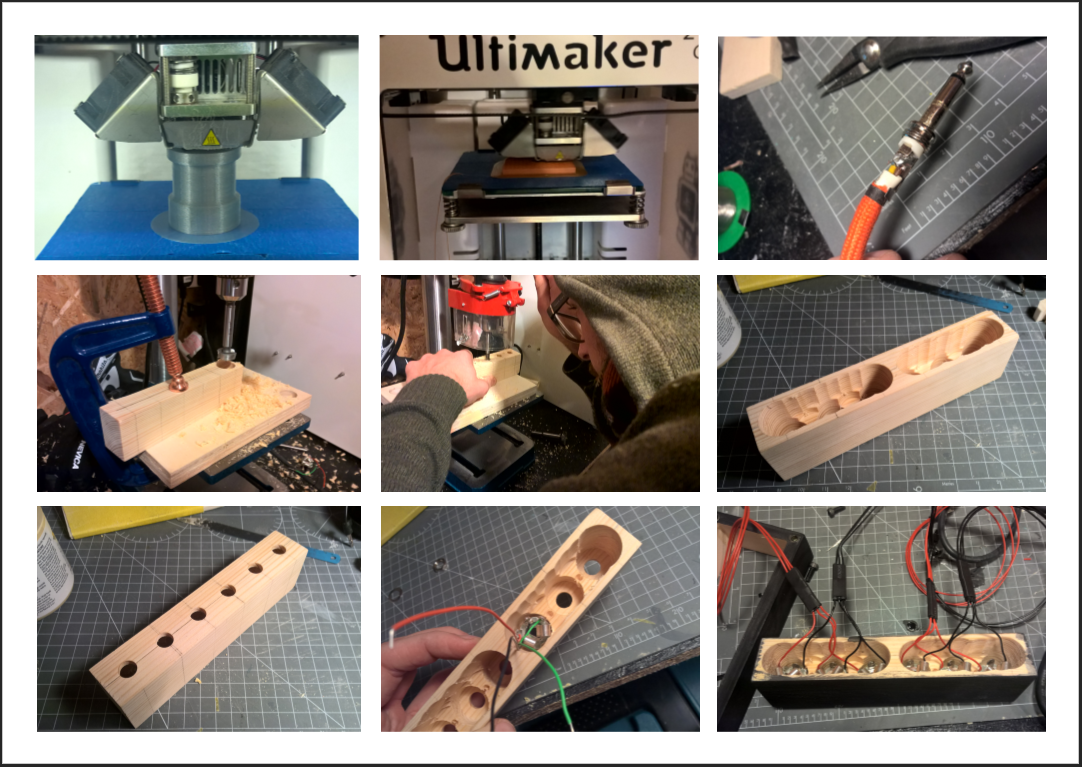
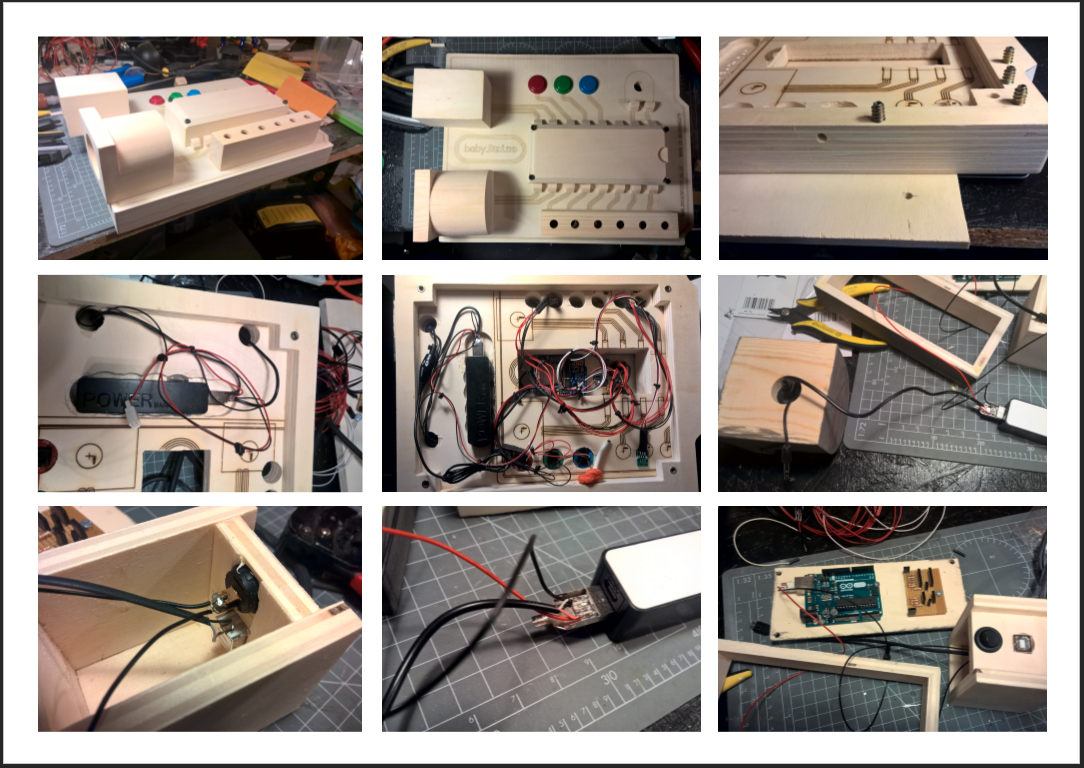
Fitting the construction around work, I managed to get most of the material processed in a day and a half. I then spent the weekend assembling, wiring, and finishing touches, it totals approx. 50 hours of work in the physical object alone, condensed into about 4 days!
Having a simple electronic setup allowed me to spend a bit of extra time on the housing of it all. That said, it is the first circuit I have designed and built myself without using a kit.
Code:
#include
#include
#include
#include "WaveUtil.h"
#include "WaveHC.h"
int jackVal=0;
int keyVal=0;
SdReader card; // This object holds the information for the card
FatVolume vol; // This holds the information for the partition on the card
FatReader root; // This holds the information for the filesystem on the card
FatReader f; // This holds the information for the file we're play
WaveHC wave; // This is the only wave (audio) object, since we will only play one at a time
#define DEBOUNCE 5 // button debouncer
// here is where we define the buttons that we'll use. button "1" is the first, button "6" is the 6th, etc
byte buttons[] = {14, 15, 16, 17, 18, 19};
// This handy macro lets us determine how big the array up above is, by checking the size
#define NUMBUTTONS sizeof(buttons)
// we will track if a button is just pressed, just released, or 'pressed' (the current state
volatile byte pressed[NUMBUTTONS], justpressed[NUMBUTTONS], justreleased[NUMBUTTONS];
// this handy function will return the number of bytes currently free in RAM, great for debugging!
int freeRam(void)
{
extern int __bss_end;
extern int *__brkval;
int free_memory;
if((int)__brkval == 0) {
free_memory = ((int)&free_memory) - ((int)&__bss_end);
}
else {
free_memory = ((int)&free_memory) - ((int)__brkval);
}
return free_memory;
}
void sdErrorCheck(void)
{
if (!card.errorCode()) return;
putstring("\n\rSD I/O error: ");
Serial.print(card.errorCode(), HEX);
putstring(", ");
Serial.println(card.errorData(), HEX);
while(1);
}
//LED stuff
// NeoPixel Ring simple sketch (c) 2013 Shae Erisson
// released under the GPLv3 license to match the rest of the AdaFruit NeoPixel library
#include
#ifdef __AVR__
#include
#endif
// Which pin on the Arduino is connected to the NeoPixels?
// On a Trinket or Gemma we suggest changing this to 1
#define PIN 7
// How many NeoPixels are attached to the Arduino?
#define NUMPIXELS 1
// When we setup the NeoPixel library, we tell it how many pixels, and which pin to use to send signals.
// Note that for older NeoPixel strips you might need to change the third parameter--see the strandtest
// example for more information on possible values.
Adafruit_NeoPixel pixels = Adafruit_NeoPixel(NUMPIXELS, PIN, NEO_RGB + NEO_KHZ800);
int delayval = 100; // delay for half a second
void setup() {
byte i;// set up serial port
Serial.begin(9600);
putstring_nl("WaveHC with ");
Serial.print(NUMBUTTONS, DEC);
putstring_nl("buttons");
putstring("Free RAM: "); // This can help with debugging, running out of RAM is bad
Serial.println(freeRam()); // if this is under 150 bytes it may spell trouble!
// Set the output pins for the DAC control. This pins are defined in the library
// pin13 LED
pinMode(13, OUTPUT);
// // Make input & enable pull-up resistors on switch pins
// for (i=0; i< NUMBUTTONS; i++) {
// pinMode(buttons[i], INPUT);
// digitalWrite(buttons[i], HIGH);
// }
// if (!card.init(true)) { //play with 4 MHz spi if 8MHz isn't working for you
if (!card.init()) { //play with 8 MHz spi (default faster!)
putstring_nl("Card init. failed!"); // Something went wrong, lets print out why
sdErrorCheck();
while(1); // then 'halt' - do nothing!
}
// enable optimize read - some cards may timeout. Disable if you're having problems
card.partialBlockRead(true);
// Now we will look for a FAT partition!
uint8_t part;
for (part = 0; part < 5; part++) { // we have up to 5 slots to look in
if (vol.init(card, part))
break; // we found one, lets bail
}
if (part == 5) { // if we ended up not finding one 🙁
putstring_nl("No valid FAT partition!");
sdErrorCheck(); // Something went wrong, lets print out why
while(1); // then 'halt' - do nothing!
}
// Lets tell the user about what we found
putstring("Using partition ");
Serial.print(part, DEC);
putstring(", type is FAT");
Serial.println(vol.fatType(),DEC); // FAT16 or FAT32?
// Try to open the root directory
if (!root.openRoot(vol)) {
putstring_nl("Can't open root dir!"); // Something went wrong,
while(1); // then 'halt' - do nothing!
}
// Whew! We got past the tough parts.
putstring_nl("Ready!");
TCCR2A = 0;
TCCR2B = 1<
//Timer2 Overflow Interrupt Enable
TIMSK2 |= 1<
// This is for Trinket 5V 16MHz, you can remove these three lines if you are not using a Trinket
#if defined (__AVR_ATtiny85__)
if (F_CPU == 16000000) clock_prescale_set(clock_div_1);
#endif
// End of trinket special code
pixels.begin(); // This initializes the NeoPixel library.
}
SIGNAL(TIMER2_OVF_vect) {
check_switches();
}
void check_switches()
{
static byte previousstate[NUMBUTTONS];
static byte currentstate[NUMBUTTONS];
byte index;
for (index = 0; index < NUMBUTTONS; index++) {
currentstate[index] = digitalRead(buttons[index]); // read the button/*
Serial.print(index, DEC);
Serial.print(": cstate=");
Serial.print(currentstate[index], DEC);
Serial.print(", pstate=");
Serial.print(previousstate[index], DEC);
Serial.print(", press=");
*/
if (currentstate[index] == previousstate[index]) {
if ((pressed[index] == LOW) && (currentstate[index] == LOW)) {
// just pressed
justpressed[index] = 1;
}
else if ((pressed[index] == HIGH) && (currentstate[index] == HIGH)) {
// just released
justreleased[index] = 1;
}
pressed[index] = !currentstate[index]; // remember, digital HIGH means NOT pressed
}
//Serial.println(pressed[index], DEC);
previousstate[index] = currentstate[index]; // keep a running tally of the buttons
}
}
void loop() {
// byte i;
int jackVal = analogRead(A0);
Serial.println (jackVal);
// play the note corresponding to each value on A0
if (jackVal == 0) {
}
if (jackVal >= 901 && jackVal <= 950) {
// play the first sample
playfile("one.wav");
while (wave.isplaying && (jackVal >= 901 && jackVal <= 950)) {}
wave.stop();
}
if (jackVal >= 500 && jackVal <= 525) {
// play the second sample
playfile("two.wav");
while (wave.isplaying && (jackVal >= 500 && jackVal <= 525)) {
// Serial.println(".");
}
wave.stop();
}
if (jackVal >= 175 && jackVal <= 185) {
// play the third sample
playfile("three.wav");
while (wave.isplaying && jackVal >= 175 && jackVal <= 185) {
// Serial.println(".");
}
wave.stop();
}
if (jackVal >= 90 && jackVal <= 95) {
// play the fourth sample
playfile("four.wav");
while (wave.isplaying && (jackVal >= 85 && jackVal <= 100)) {
// Serial.println(".");
}
wave.stop();
}
if (jackVal >= 35 && jackVal <= 45) {
// play the fith sample
playfile("five.wav");
while (wave.isplaying && (jackVal >= 35 && jackVal <= 45)) {
// Serial.println(".");
}
wave.stop();
}
if (jackVal >= 5 && jackVal <= 13) {
// play the sixth sample
playfile("six.wav");
while (wave.isplaying && (jackVal >= 5 && jackVal <= 13)) {
// Serial.println(".");
}
wave.stop();
}
///////////////////////////////////////////////////////////////////////
///////////////////////////////////////////////////////////////////////
int keyVal = analogRead(A1);
// print out the value you read:
//Serial.println("a1");
Serial.println (keyVal);delay(100); // delay in between reads for stability
//RED/GREEN/BLUE/OFF
if (keyVal >= 180 && keyVal <= 190) {
for(int i=0;i
pixels.setPixelColor(i,pixels.Color(255,0,0));
pixels.show(); }
// This sends the updated pixel color to the hardware.
else if (keyVal >= 490 && keyVal <= 510) {
for(int i=0;i
pixels.setPixelColor(i,pixels.Color(0,255,0));
pixels.show(); }
// This sends the updated pixel color to the hardware.
else if (keyVal >= 5 && keyVal <= 15) {
for(int i=0;i
pixels.setPixelColor(i,pixels.Color(0,0,255));
pixels.show(); }
else{
for(int i=0;i
pixels.show(); // This sends the updated pixel color to the hardware.
}
////////////////////////////////////////////////////////////////////////
////////////////////////////////////////////////////////////////////////
}
void playfile(char *name) {
// see if the wave object is currently doing something
if (wave.isplaying) {// already playing something, so stop it!
wave.stop(); // stop it
}
// look in the root directory and open the file
if (!f.open(root, name)) {
putstring("Couldn't open file "); Serial.print(name); return;
}
// OK read the file and turn it into a wave object
if (!wave.create(f)) {
putstring_nl("Not a valid WAV"); return;
}// ok time to play! start playback
wave.play();
}
references
https://cdn-learn.adafruit.com/assets/assets/000/010/347/original/wavehc_play6interloop.pde.txt